Home
ProductsSupport Ticket Plus – Complete Laravel Ticketing System
Support
Secure Checkout
Instant Delivery
Digital Download
Support
Support Ticket Plus – Complete Laravel Ticketing System
A complete help desk and ticket management system for teams of any size — with role-based access, email-to-ticket, AI reply suggestions, knowledge base, SLA reports, and free installation support. The Lucrative team will help with your installation.
Support Ticket Plus is a production-ready Laravel application for managing customer support requests from creation through resolution. It supports multiple user roles, automated ticket routing, SLA tracking, rich email notifications, and flexible configuration — all manageable from a modern admin interface.
👥 Multi-Role Access
Separate experiences for Admin, Support Agent, and Customer with granular permission control.
🎫 Full Ticket Lifecycle
Seven ticket statuses from Open to Closed, with priority-based SLA deadlines and reopen support.
📧 Email Integration
Webhook email-to-ticket, Gmail inbox polling, and customizable HTML email templates.
📊 Reports & Analytics
Volume trends, agent performance metrics, and SLA compliance dashboards.
🤖 AI Reply Suggestions
Rule-based or OpenAI-powered reply suggestions configurable from admin settings.
⚙️ Free Installation Support
Built-in web installer wizard for production deployment — no command line required. The Lucrative team will help with your installation.
Tech Stack
Built on modern, widely-supported technologies for easy deployment on shared hosting, VPS, or local development environments like Laragon.
Supports JSON, Mailgun inbound, and SendGrid inbound parse formats
Webhook authentication via header, Bearer token, or query parameter
Automatic reply detection when subject contains ticket number (e.g. [TKT-1001])
Gmail inbox polling — no third-party webhook service required
Scheduled email fetch every minute via Laravel scheduler
AI & Knowledge Base
AI reply suggestions on ticket detail page (one-click insert)
Configurable AI provider — rule-based templates or OpenAI API
Public knowledge base / FAQ section for self-service support
Searchable articles with slug-based URLs
Admin can publish and manage articles from the dashboard
Screenshots
Visual walkthrough of the application interface and admin settings.
Login Page
Secure authentication with password reset and optional customer registration.
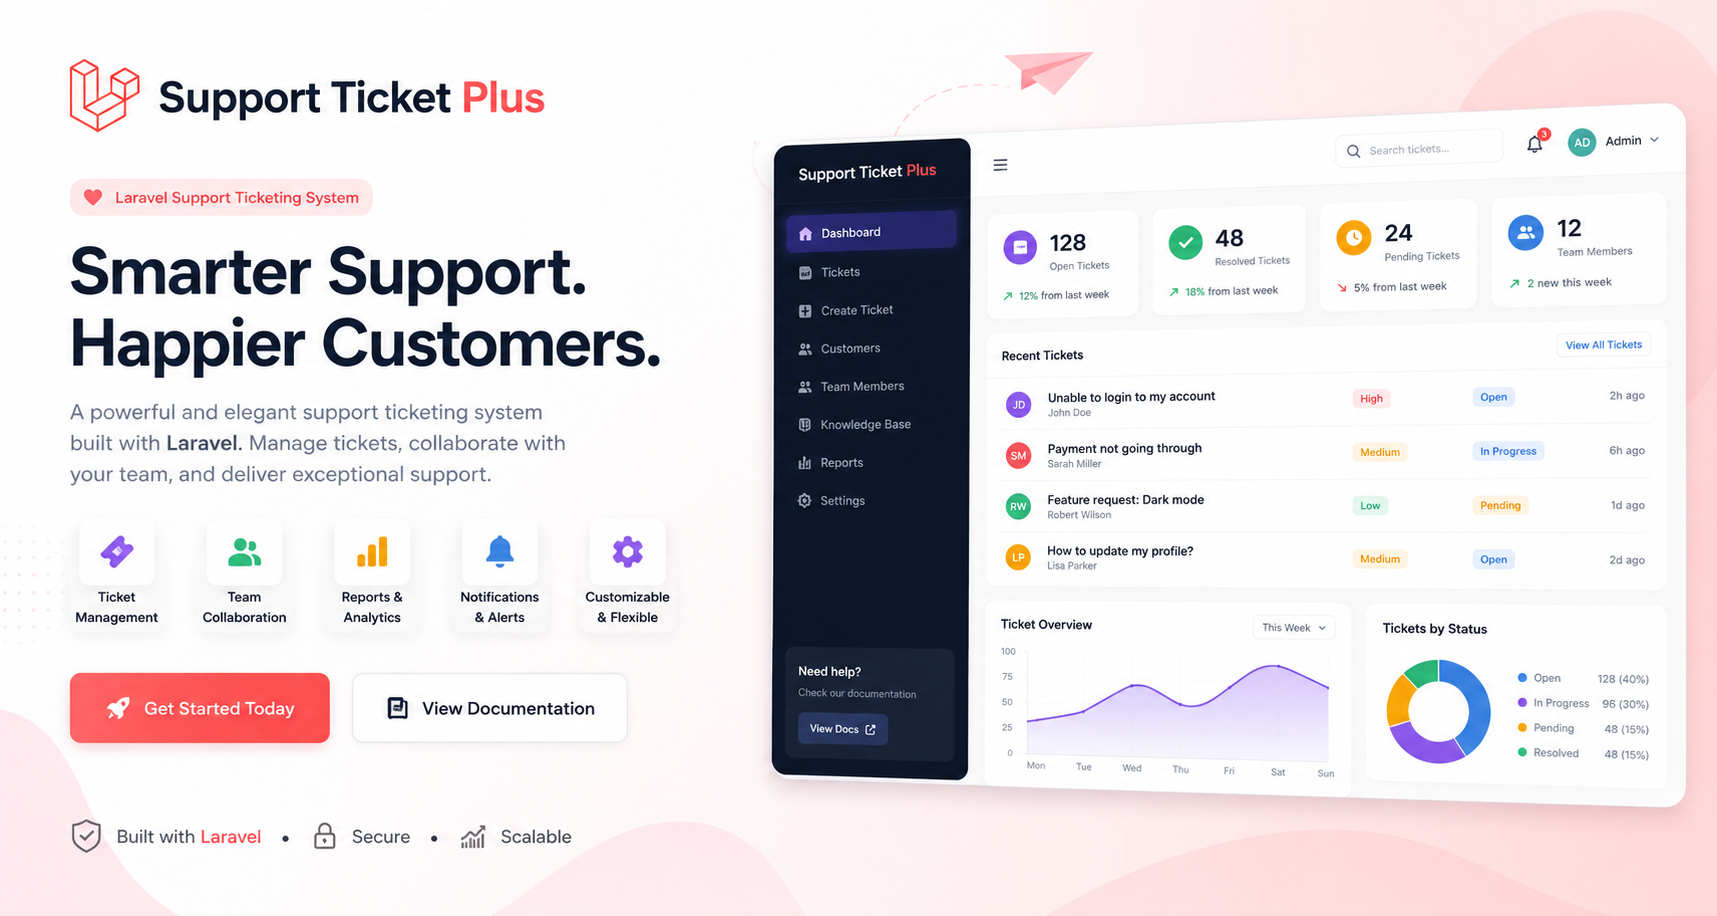
Dashboard
At-a-glance overview of open tickets, recent activity, and key metrics.
Ticket List
Filterable list with status, priority, and assignment columns.
Create Ticket
Customers and agents can submit tickets with attachments.
Ticket Details & Reply
Full conversation thread with public replies, internal notes, status controls, and AI suggestions.
Add Reply
Rich reply interface with attachment support and internal note toggle.
Administration
Support Agents
Manage agent accounts and department assignments.
Customers
View and manage customer accounts.
Departments
Organize tickets by department with round-robin auto-assignment.
Role Management
Create custom roles with granular permission control.
Reports & Analytics
Ticket volume trends, agent performance, and SLA compliance metrics.
Knowledge Base
Self-service FAQ articles for customers.
Settings
General Settings
Site title, branding, logo, ticket prefix, and registration options.
SMTP Settings
Configure outgoing email for ticket notifications.
Email Template Settings
Manage notification templates for each ticket event.
Email Template Builder
Visual drag-and-drop builder for HTML email templates.
Gmail Inbound Email
Poll a Gmail inbox directly to create tickets from incoming emails.
AI Settings
Configure AI reply suggestions — rule-based or OpenAI integration.
Installation
Two installation methods are supported — free installation support with a guided web installer for production servers, and a manual CLI setup for local development. The Lucrative team will help with your installation. Root access (SSH/sudo) is recommended during installation so folder permissions can be set correctly on storage/, bootstrap/cache/, and public/uploads/.
Root access recommended. Install with SSH/sudo or as a user with write access to all project folders. After setup, configure the queue worker and scheduler — see Background Processes (required for emails, Gmail inbound, and SLA alerts).
Web Installer — Free Installation Support
Free Installation Support Built-in web installer wizard for production deployment — no command line required. Upload the project to your server and visit your site URL to open the setup wizard at /install. The Lucrative team will help with your installation.
Installation screenshots pending. Screenshots for the installer wizard steps will be added here. Place your images in public/images/install/ and update the src attributes below.
Upload Files
Upload all project files to your web server. Root or sudo access is recommended to set ownership and permissions correctly. Ensure the following directories and files are writable by the web server:
storage/ and all subdirectories
bootstrap/cache/
public/uploads/
.env file
Screenshot: File upload / server setup
Expected path: images/install/step-upload.png
Step 1 — Upload project files to your server
Welcome & Requirements Check
Visit your site URL. The installer checks PHP version (8.2+), required extensions (PDO, MySQL, Mbstring, OpenSSL, etc.), and folder permissions automatically.
Screenshot: Welcome & requirements screen
Expected path: images/install/step-welcome.png
Step 2 — Welcome screen and server requirements verification
Database Configuration
Enter your MySQL connection details — host, port, database name, username, and password. The installer will create the database automatically if it doesn't exist.
Screenshot: Database configuration
Expected path: images/install/step-database.png
Step 3 — Enter MySQL database credentials
Site Setup & Admin Account
Configure your help desk name, site URL, and create the administrator account (name, email, password).
Screenshot: Site setup & admin account
Expected path: images/install/step-setup.png
Step 4 — Site information and administrator account creation
Installation Complete
The installer runs migrations, seeds default data, and creates the install lock file. Log in with your new admin credentials, then complete the Background Processes setup so emails and scheduled tasks work.
Screenshot: Installation complete
Expected path: images/install/step-complete.png
Step 5 — Installation finished — ready to log in
If you see "Route [install.index] not defined", delete the cached routes file on your server: bootstrap/cache/routes-v7.php, then reload the site.
Manual Installation (Development)
For local development with Laragon, XAMPP, or similar environments:
cd support_ticket
composer install
cp .env.example .env          # if needed
php artisan key:generate

# Create the MySQL database (Laragon: ensure MySQL is running)
mysql -u root -e "CREATE DATABASE IF NOT EXISTS ticket CHARACTER SET utf8mb4 COLLATE utf8mb4_unicode_ci;"

php artisan migrate:fresh --seed
php artisan storage:link

# Mark app as installed (skips the web installer redirect)
echo "installed" > storage/app/installed

php artisan serve
Visit http://localhost:8000 and log in with one of the demo accounts below. Then set up queue and scheduler processes so notification emails are sent.
Demo Accounts
Pre-seeded after migrate:fresh --seed:
Role
Email
Password
Admin
admin@supportticketplus.local
password
Agent
sarah@supportticketplus.local
password
Customer
john@example.com
password
Change these passwords immediately after deploying to a production environment.
Gmail Inbound Setup (Optional)
After installation, configure Gmail polling to automatically create tickets from incoming emails:
Enable 2-Step Verification on your Google account.
Configure an inbound mail provider to POST to your webhook URL:
Go to Admin → Settings and enable Email-to-ticket webhook.
Copy the Webhook URL and Webhook Secret.
Configure your mail provider (Mailgun, SendGrid, etc.) to POST to the webhook.
{
  "from_email": "customer@example.com",
  "from_name": "Jane Doe",
  "subject": "Need help with billing",
  "body": "I was charged twice this month.",
  "department_slug": "billing"
}
Background Processes
Required after both web installer and manual installation. Support Ticket Plus queues outbound emails and runs scheduled tasks for Gmail inbound polling and SLA checks. Without these processes, notification emails will not send and inbound email / SLA alerts will not run.
Configure both a queue worker and the Laravel scheduler on every production server — whether you used the web installer or manual setup.
Production tip: Use Supervisor for queue:work and a system cron job for schedule:run. Both must stay running 24/7 for reliable email delivery and inbound ticket creation.
Server Requirements
Minimum server requirements checked automatically by the web installer.
PHP & Extensions
PHP 8.2 or higher
PDO extension
PDO MySQL extension
Mbstring extension
OpenSSL extension
Tokenizer extension
XML extension
Ctype extension
JSON extension
Fileinfo extension
Software & Permissions
MySQL 5.7+ or MariaDB 10.3+
Composer (for manual install)
Apache or Nginx with mod_rewrite
Writable storage/ directory
Writable bootstrap/cache/
Writable public/uploads/
Writable .env file
Production (Email & Scheduling)
Root or sudo access recommended for email setup
Supervisor (recommended for queue:work)
System cron for schedule:run
SMTP configured in Admin → Settings
Frequently Asked Questions
Common questions about Support Ticket Plus, installation, email setup, and licensing.
Do you offer free installation support?
Yes. Support Ticket Plus includes free installation support. A built-in web installer wizard handles production setup with no command line required, and the Lucrative team will help with your installation if you need assistance.
What are the server requirements?
You need PHP 8.2+, MySQL 5.7+ (or MariaDB 10.3+), and standard Laravel extensions (PDO, Mbstring, OpenSSL, etc.). Apache or Nginx with URL rewriting is required. See the Server Requirements section for the full list.
How do I install Support Ticket Plus on my server?
Upload the files to your server, ensure storage/, bootstrap/cache/, and public/uploads/ are writable, then visit your domain. You will be redirected to /install to complete the setup wizard.
For local development, use the manual CLI steps in the Manual Installation section.
Why are notification emails not sending?
Ticket emails are queued in the background. You must run a queue worker:
php artisan queue:work (development) or Supervisor in production. Also configure SMTP under Admin → Settings. See Background Processes.
What are queue:work and schedule:work for?
queue:work sends queued notification emails. schedule:work (or a cron job running schedule:run) handles Gmail inbox polling and SLA deadline checks. Both are required after installation for full email functionality.
Can customers create tickets by email?
Yes. You can enable Gmail inbound polling in Admin → Settings, or use the email-to-ticket webhook (POST /api/email-ticket) with Mailgun, SendGrid, or similar providers. Replies to existing tickets are detected when the subject contains the ticket number (e.g. [TKT-1001]).
Does AI require an OpenAI API key?
No. AI reply suggestions can use rule-based templates out of the box. OpenAI integration is optional and configurable in Admin → Settings → AI.
Does it work on shared hosting?
Yes, on hosts that support PHP 8.2+, MySQL, and Laravel. The web installer is designed for shared hosting. For reliable emails and Gmail polling, your host must allow cron jobs and ideally long-running processes (or use an external cron service for schedule:run).
What user roles are included?
Three built-in roles: Admin, Agent, and Customer. Admins can create custom roles with granular permissions for tickets, users, departments, reports, settings, and the knowledge base.
Are demo accounts included for testing?
Yes, after running migrate:fresh --seed (manual install) or completing the web installer with seed data. Demo logins are listed in the Manual Installation section. Change all passwords before going live.
I see "Route [install.index] not defined" — what should I do?
Delete the cached routes file on your server: bootstrap/cache/routes-v7.php, then reload the site. This clears a stale route cache from before installation.
Can I customize branding and email templates?
Yes. Upload your logo, set the site title and ticket prefix under Admin → Settings → General. Email templates can be edited individually or built visually with the drag-and-drop template builder.
Event Manager Plus is a Laravel-based event management and ticketing platform to create events, sell tickets, manage bookings, and handle QR-based check-ins with multiple payment gateways.It includes a modern public site, powerful admin dashboard, easy web installer, and optional AI features for reporting and event assistance.