
Home / WordPress Plugins / WordPress Support Ticket System Pro

Wordpress Support Ticket

Download the plugin free version

WordPress Support Ticket System – Help Desk Plugin

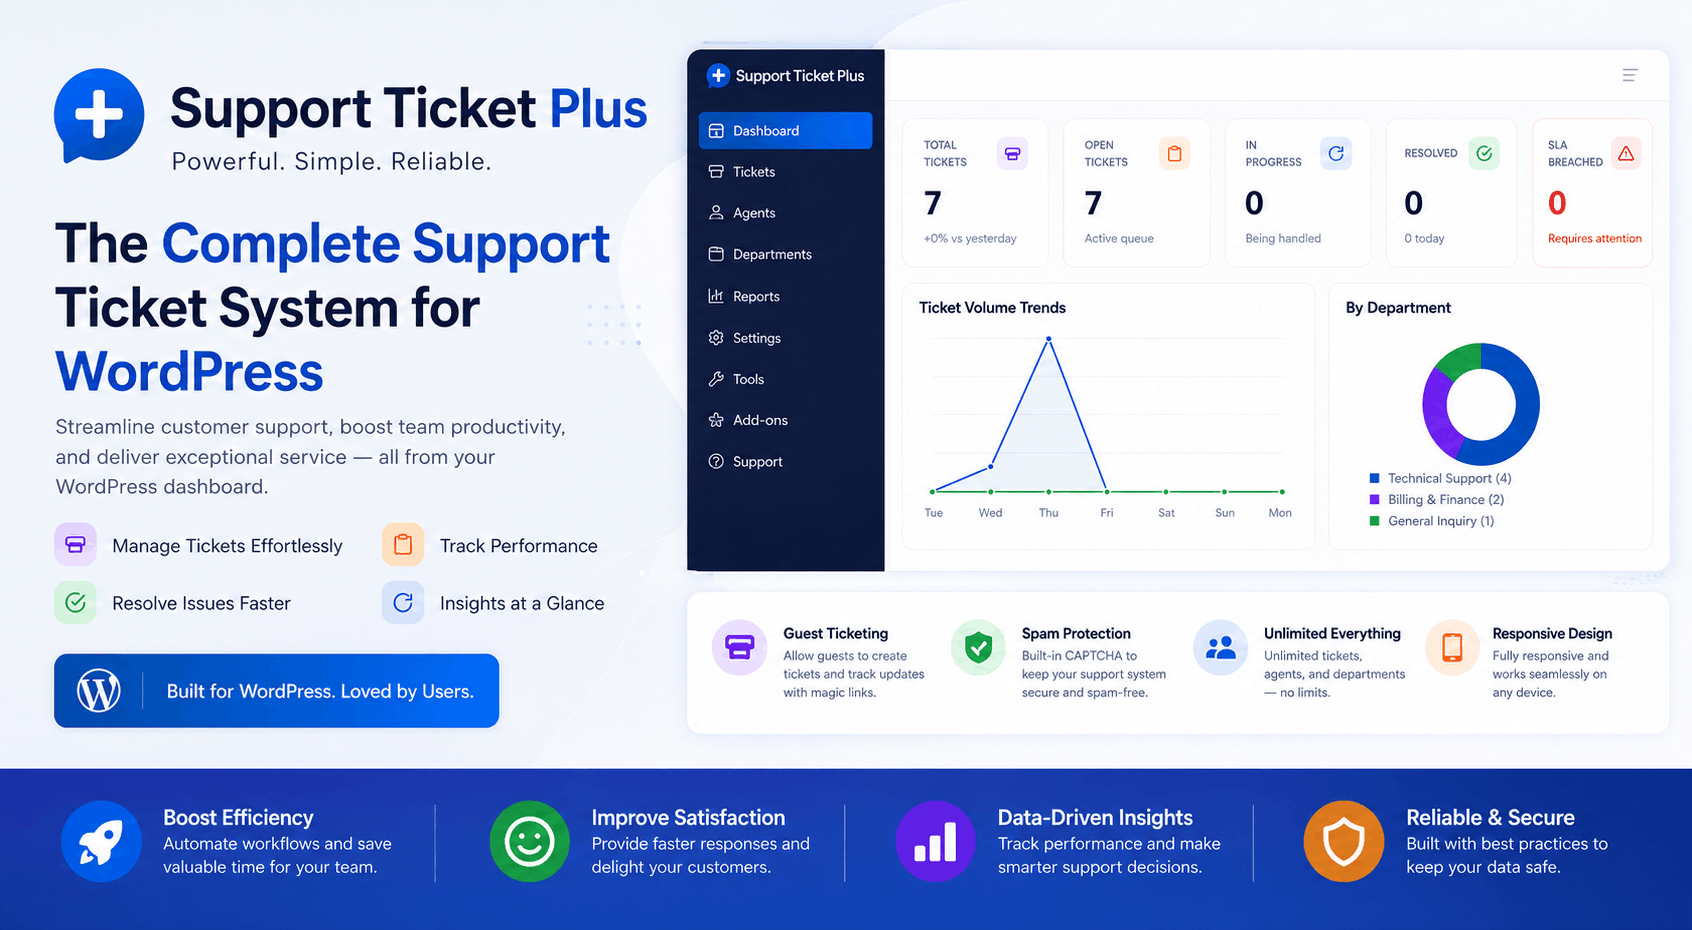
WordPress Support Ticket System Pro is a complete help desk solution that enables businesses to manage customer support efficiently. Create tickets, assign departments, automate workflows, convert incoming emails into support tickets, allow customers to reply directly from their email, manage SLA, build a knowledge base, and provide exceptional customer service—all from your WordPress dashboard.

Starting at

$39.00 /year

or $199.00 lifetime

Secure
Checkout

Instant
Delivery

Digital
Download

14 Days
Money Back

Free Install
On Request

Powerful WordPress Support Ticket Plugin for Customer Support

Support Ticket Plus is a powerful WordPress support ticket plugin that turns your website into a complete customer support and helpdesk system. Easily manage customer inquiries, technical issues, bug reports, feature requests, and service requests from one centralized ticket management dashboard. Customers can submit and track tickets, communicate with support agents, upload attachments, and access their support history, while your team can assign tickets, manage departments, set priorities, track SLA, and monitor support performance.

Designed for businesses, WooCommerce stores, agencies, freelancers, SaaS companies, and WordPress product developers, Support Ticket Plus provides everything you need to build a professional WordPress helpdesk and customer support ticket system without relying entirely on external helpdesk platforms. With features such as guest tickets, email notifications, custom fields, knowledge base, reports, SMTP support, and advanced Pro functionality, you can deliver faster, more organized, and scalable customer support directly from WordPress.

Pricing

Choose your license

Transparent pricing. Instant delivery after purchase.

Per Year

Renews annually

Flexible
$39.00 /year

Instant digital download

  • 12 months of updates & support
  • Free installation on request
  • 7-day return policy
  • Instant digital download

Lifetime

Pay once, own forever

Best value
$199.00 one-time

Instant digital download

  • Lifetime updates & support
  • Free installation on request
  • 14 days money back guarantee
  • Instant digital download
WordPress Plugin

LucrativeIt Support Ticket Plus(Wordpress support ticket) — Product Specification

A production-ready help desk for WordPress. Manage support requests from creation through resolution with a customer portal, guest ticketing with magic links, live chat, agent dashboard, SLA tracking, and optional Pro add-on for email ticketing, AI, and an embeddable chat widget.

WordPress 6.2+ PHP 8.2+ License GPLv2 Shortcode [lucrativeit_support_portal] Live chat [lucrativeit_live_chat]

SLA Tracking

Priority-based deadlines & breach alerts

Departments

Round-robin auto-assignment

Customer Portal

Tickets, KB, notifications

Guest Tickets

Submit without login + magic link

Turnstile CAPTCHA

Cloudflare spam protection for guests

Projects

Route tickets by project title

Custom Fields

Extra fields on the ticket form

Support Hours

Opening hours & live status

Instant Reply

Auto message after ticket create

Live Chat

Floating widget & agent console

Built-in SMTP

Reliable email delivery

Reports

Volume, SLA, agent performance

Email Templates

Branding, merge tags & preview (Pro)

Pro Add-on

Email ticketing, Gmail, AI, embed chat

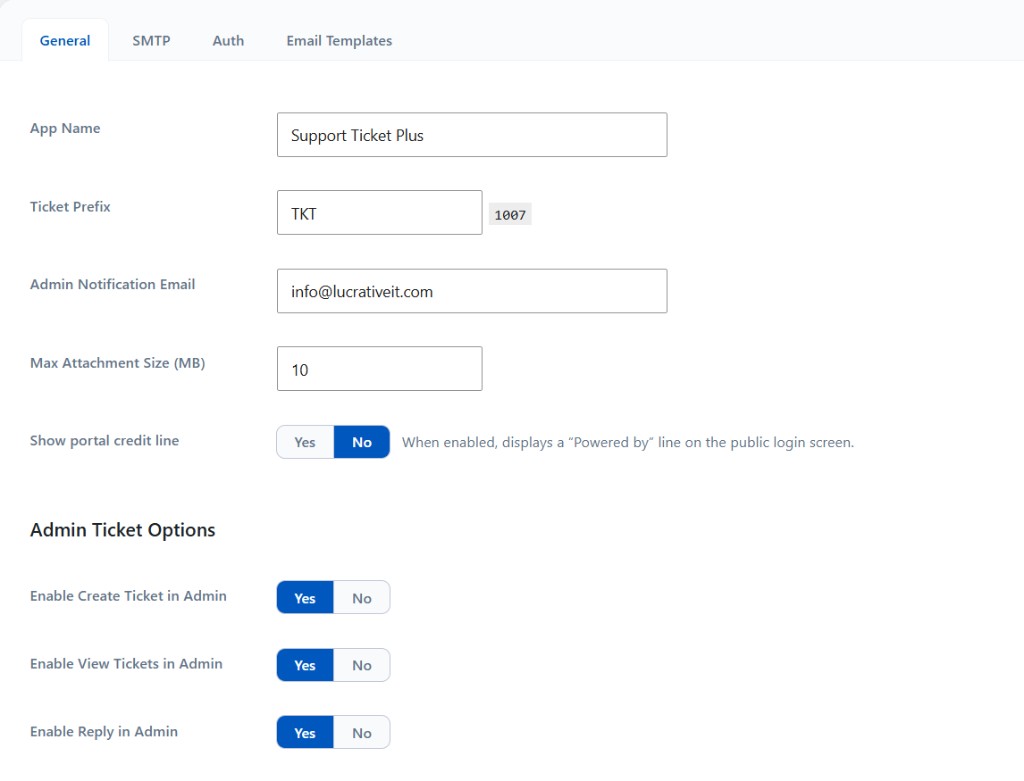
General settings configuration
Installation

Install & configure in minutes

Upload the plugin, activate it, and the Support Portal page is created automatically with the portal shortcode.

  1. Upload to wp-content/plugins/lucrativeit-support-ticket-plus/ or install via ZIP upload.
  2. Activate LucrativeIt Support Ticket Plus from the Plugins screen.
  3. Open the auto-created Support Portal page and add it to your site menu.
  4. Configure app name, ticket prefix, admin email, and attachment limits under Settings → General.
  5. Create departments and assign agent roles under Departments and Roles.
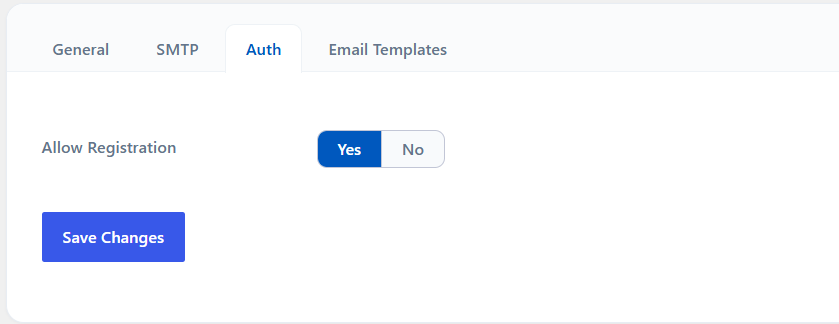
Allow registration setting
Authentication

Enable customer registration

Customers can submit tickets with a registered account, or as a guest without logging in (see Guest tickets). Registration requires two settings — both must be enabled.

  • WordPress: Go to Settings → General and check Anyone can register.
  • Plugin: Go to Support Ticket Plus → Settings → Auth and set Allow Registration to Yes.

New users receive the Subscriber role and can only view their own tickets. Promote staff by granting the Tickets permission under Roles.

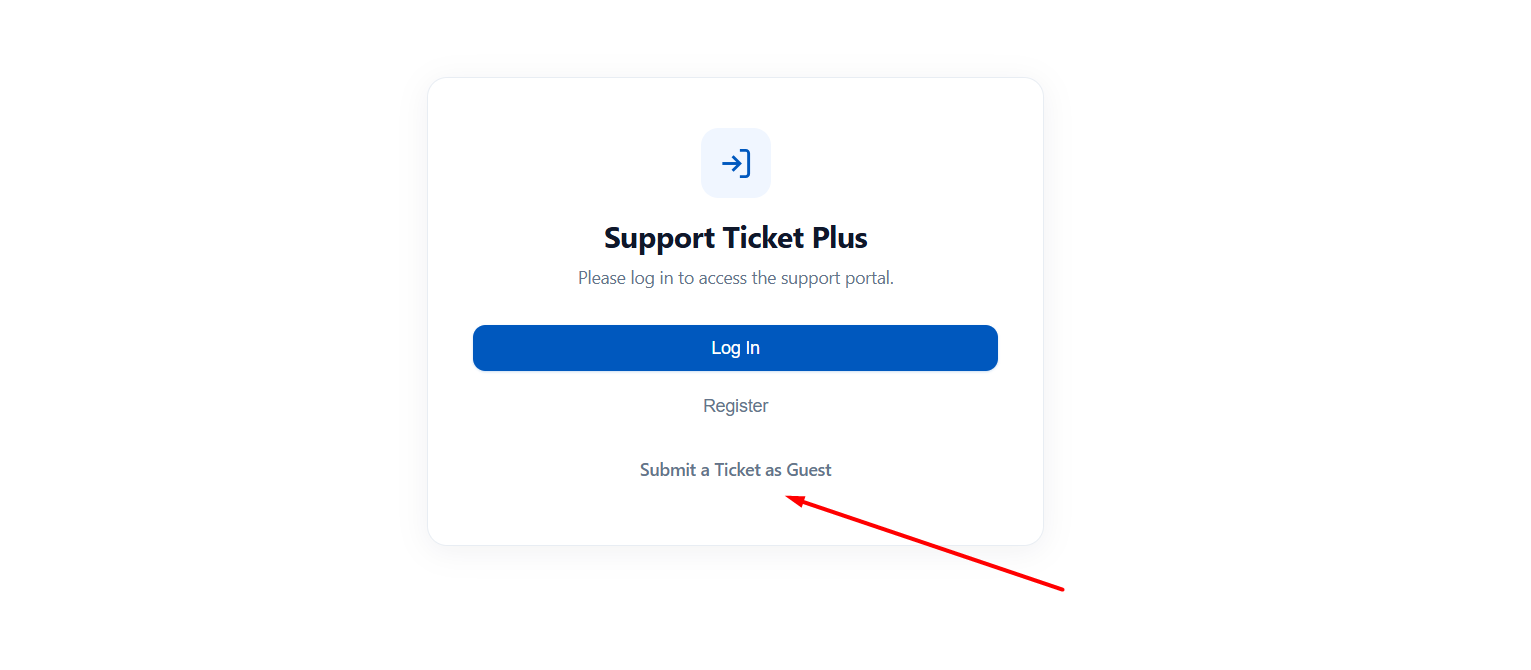
Submit a ticket as guest on the login screen
Guest access

Submit tickets without logging in

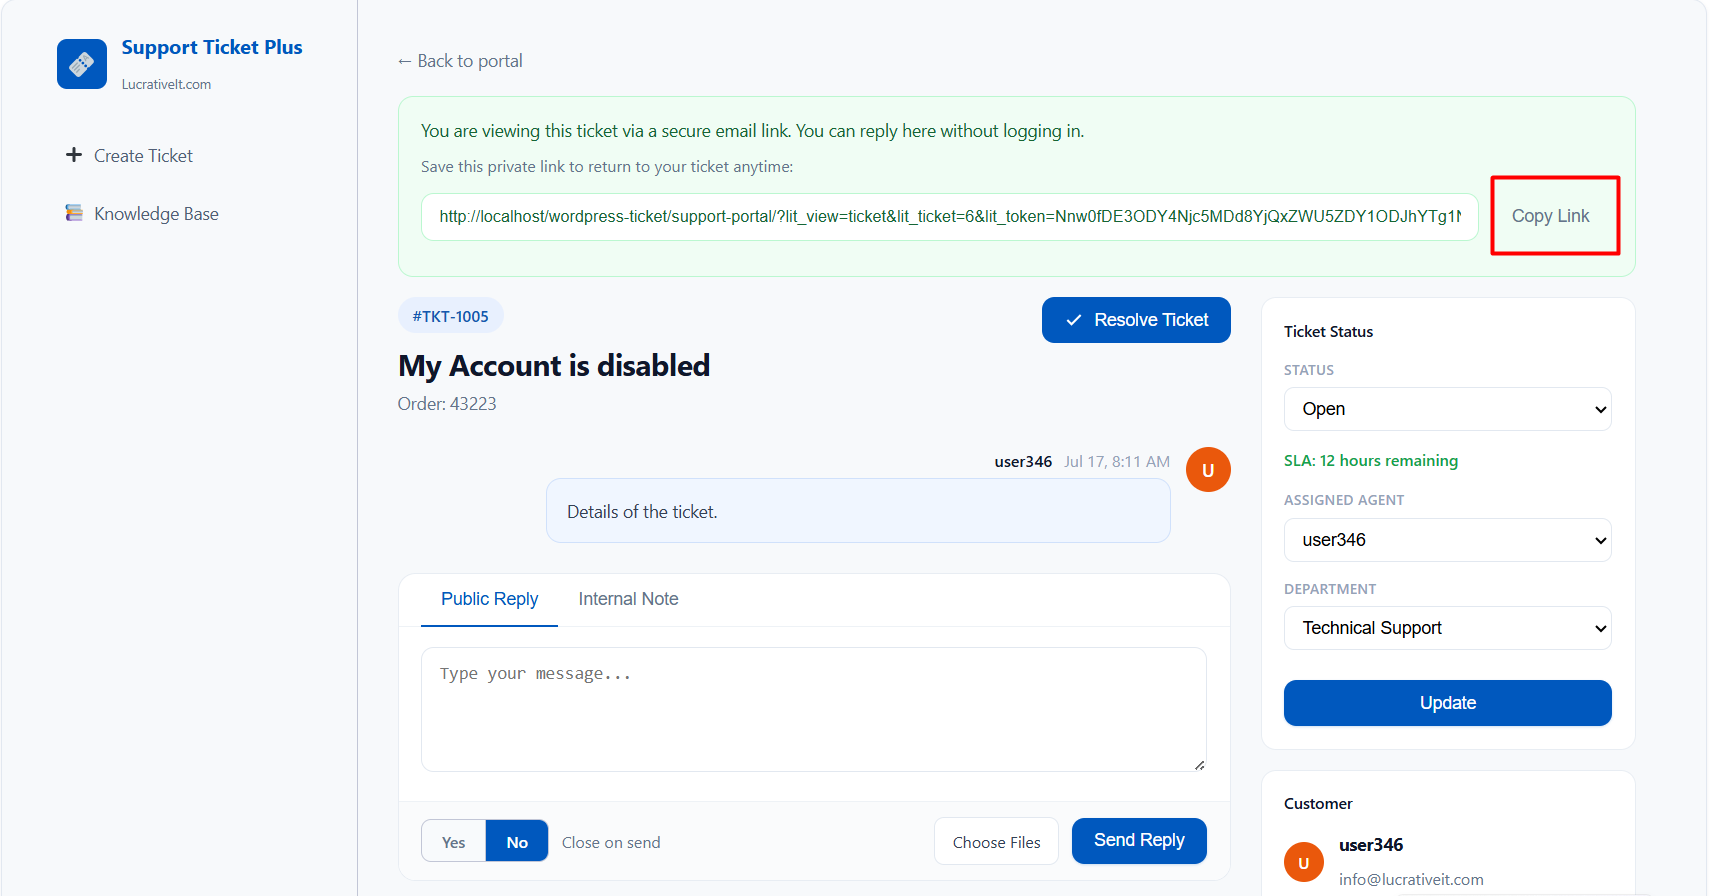
Visitors who are not logged in see a Submit a Ticket as Guest link on the portal login screen. They enter name and email, complete the ticket form, and receive a confirmation email with a secure link — no account required.

  • Enable: Settings → General → Allow Guest Tickets (on by default).
  • Auto account: A customer account is created automatically when needed.
  • Same form: Subject, department, priority, description, and attachments — plus name and email fields.
  • After submit: The guest is redirected to the ticket via a signed magic link (valid 30 days).

Configure Cloudflare Turnstile under Settings → General to protect the guest form from spam — see Turnstile CAPTCHA.

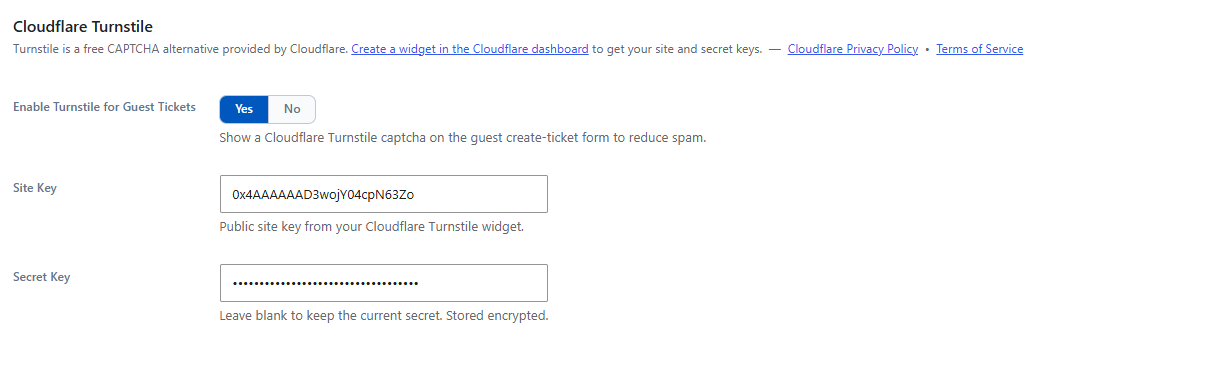
Cloudflare Turnstile settings
Anti-spam

Cloudflare Turnstile CAPTCHA

Reduce spam on guest ticket submissions with Cloudflare Turnstile — a free, privacy-friendly CAPTCHA alternative.

  • Enable: Settings → General → Enable Turnstile for Guest Tickets.
  • Site Key & Secret Key: From your Cloudflare Turnstile dashboard.
  • Encrypted storage: The secret key is stored encrypted; leave blank to keep the current value.
  • Guest form only: Turnstile appears on the guest create-ticket form, not for logged-in users.
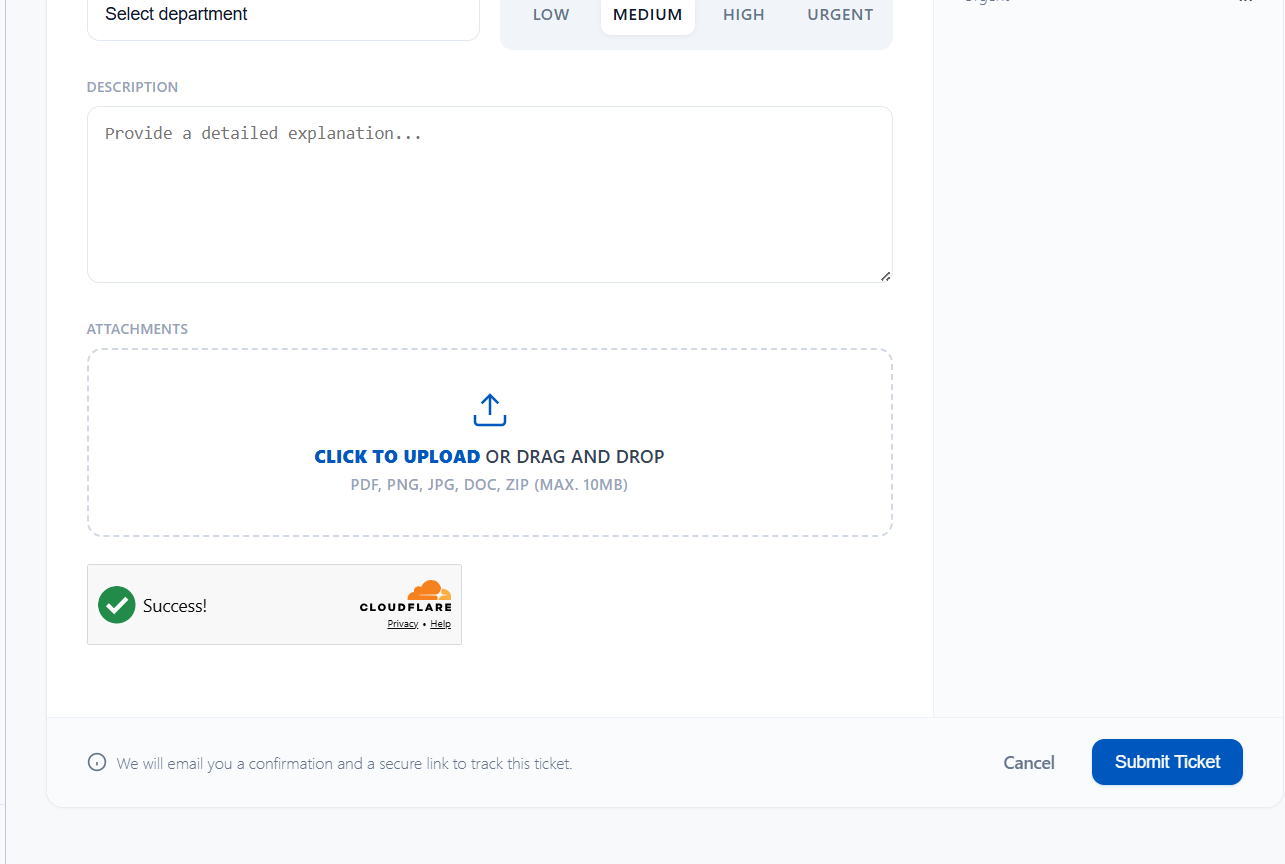
Turnstile widget on guest ticket form
Anti-spam

CAPTCHA on the guest ticket form

When Turnstile is enabled, guests must complete verification before submitting a ticket. The widget appears below the attachments area on the create-ticket form.

If verification fails, the form redisplays with an error message. Guests see: We will email you a confirmation and a secure link to track this ticket.

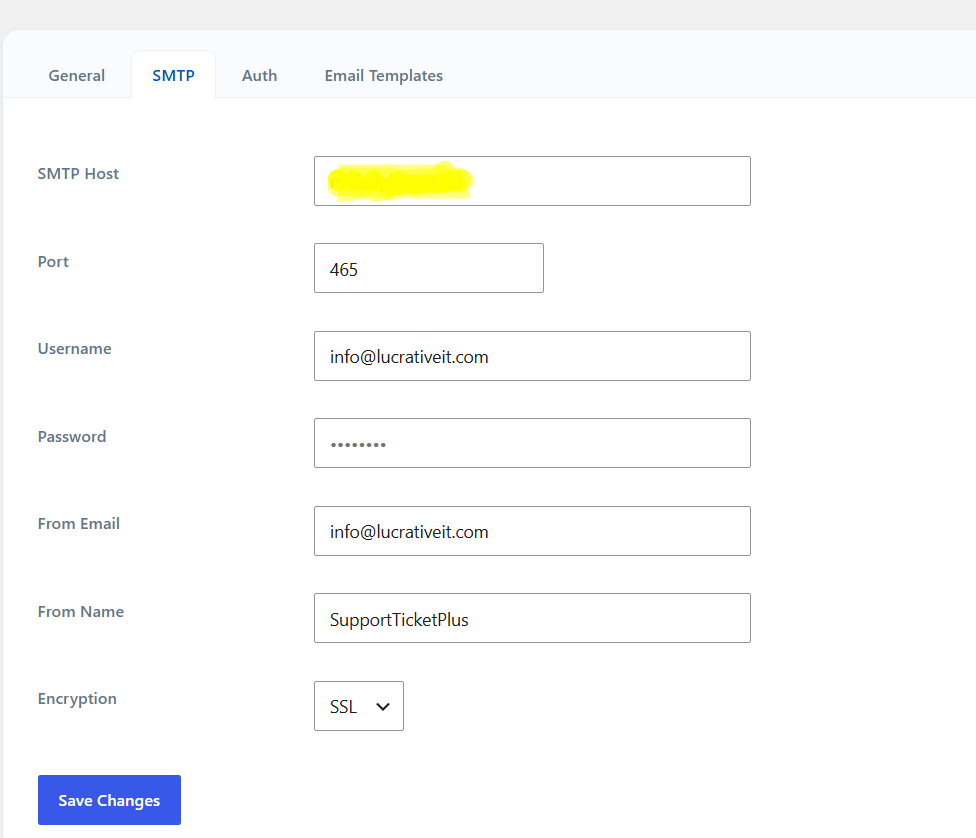
SMTP configuration
Email delivery

Why SMTP & how to set it up

WordPress default mail often fails or lands in spam. Support Ticket Plus sends registration details, ticket alerts, reply notifications, and status updates — SMTP ensures they reach the inbox.

  • Host & Port: From your provider (e.g. port 465 for SSL, 587 for TLS).
  • Credentials: Full email as username; use app passwords for Gmail.
  • From Email / Name: The sender address and display name customers see.
  • Encryption: Match SSL or TLS to your port.

Customize notification content under Settings → Email Templates. With Pro, use the full template manager for branding, merge tags, preview, and test emails — see Email templates & branding.

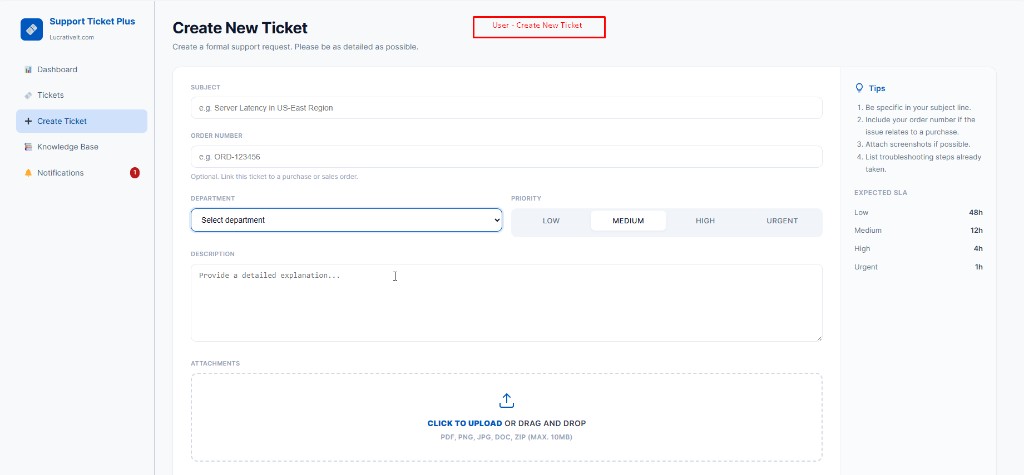
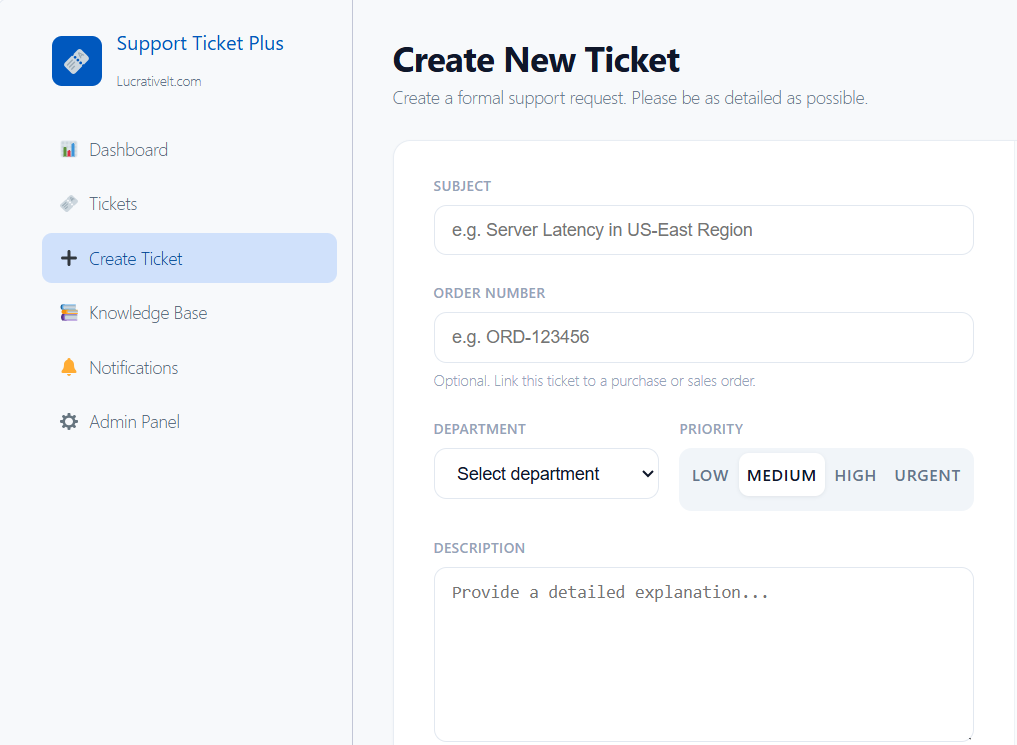
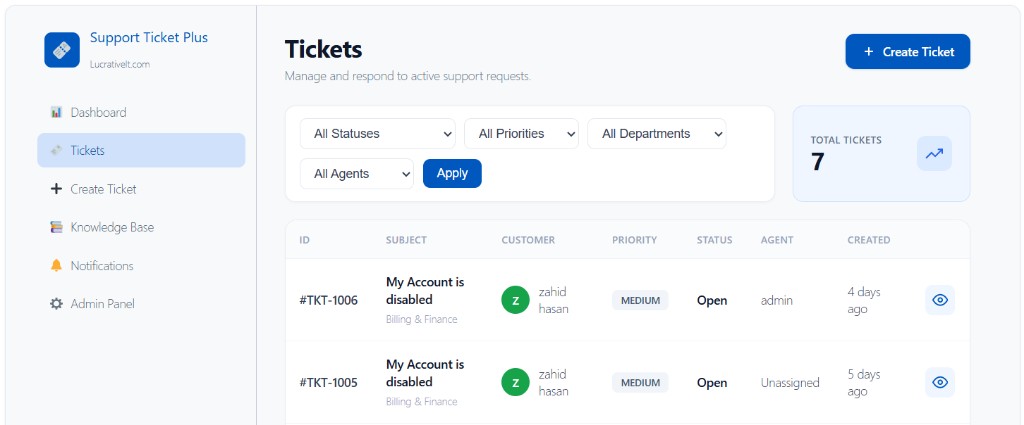
Create new ticket form
Ticketing

Create a support ticket

Customers, guests, and agents submit tickets from the portal or WordPress admin. Each ticket gets a unique ID like #TKT-1001. Guests enter name and email; logged-in users skip those fields.

  • Subject — short summary of the issue
  • Order Number — optional purchase reference
  • Department — routes to the correct team
  • Project — optional project title (see Projects)
  • Priority — Low, Medium, High, or Urgent (with SLA targets)
  • Custom fields — any extra fields you define under Settings (see Custom Fields)
  • Description — full details
  • File uploading — PDF, PNG, JPG, DOC, ZIP (default 10 MB limit under Settings → General)
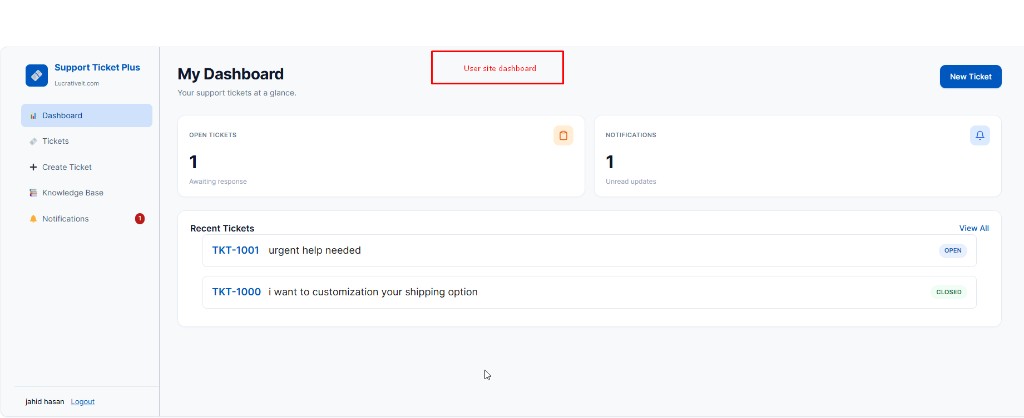
Customer dashboard overview
Customer portal

Customer dashboard

Logged-in customers land on a personal overview of their support activity with quick actions to create a ticket or open recent requests.

  • Ticket summary — open, waiting, and resolved counts at a glance.
  • Quick actions — jump to Create Ticket, My Tickets, Knowledge Base, or Notifications.
  • Recent tickets — latest conversations with status and priority badges.
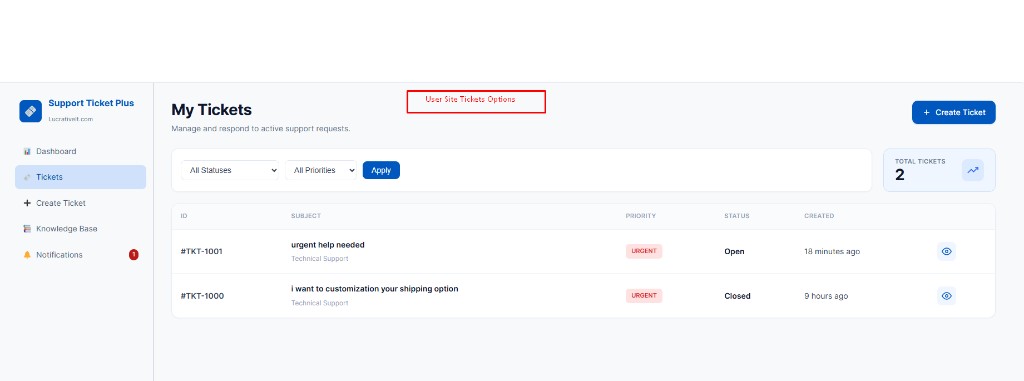
Customer My Tickets list
Customer portal

My Tickets

Customers browse their own ticket history in a clean list view — only tickets they own are shown.

  • Filter or scan by status and priority.
  • Open any ticket to continue the conversation or update status (when allowed).
  • Guests using a magic link go straight to a single ticket instead of this list.
Create ticket from staff or admin portal
Ticketing

Create a ticket as staff

Agents can open tickets on behalf of a customer from the portal or WordPress admin (when enabled under Settings → General → Admin Ticket Options).

  • Customer — select an existing customer account (required in admin).
  • Same core fields as the public form: subject, order number, department, project, priority, custom fields, description, and attachments.
  • Useful for phone or email requests that need to be logged in the help desk.
Staff ticket list
Conversation

Reply to tickets

Agents and customers communicate through a threaded conversation on each ticket. Open any ticket via the eye icon in the list.

  • Public Reply — visible to the customer; triggers email and in-app notifications.
  • Internal Note — staff-only; never shown to the customer.
  • File uploading — attach files when sending a reply (same allowed types as create).
  • Timeline — staff see an activity history for status changes, assignment, and other ticket events in the sidebar.

Filter tickets by status, priority, department, project, and agent. Resolve tickets directly from the detail view. Toggle admin reply access under Settings → General → Enable Reply in Admin.

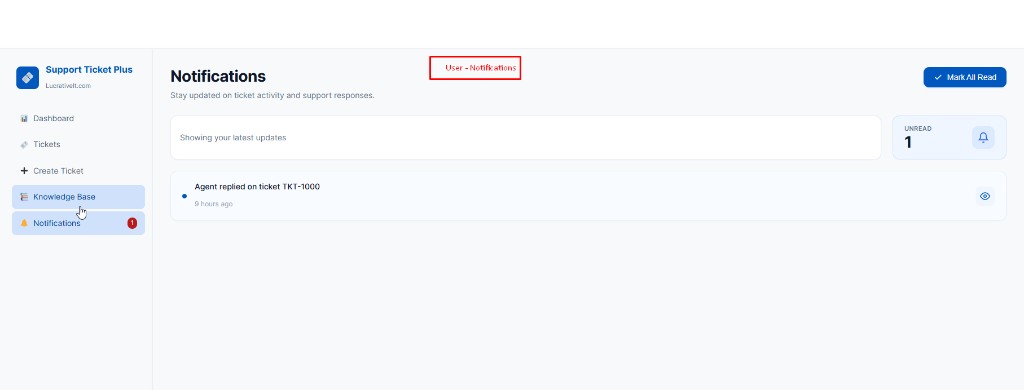
Portal notifications
Notifications

Stay updated on every reply

Support Ticket Plus delivers updates through the portal and via email (when SMTP is configured).

  • In-app: Unread badge on the sidebar, notification center with Mark All Read, and one-click ticket access.
  • Email: Alerts for new tickets, public replies, assignments, and status changes.

Set the admin notification email under Settings → General so your team never misses a new request. Customize branded email wrappers and per-event templates under Settings → Email Templates when Pro is active.

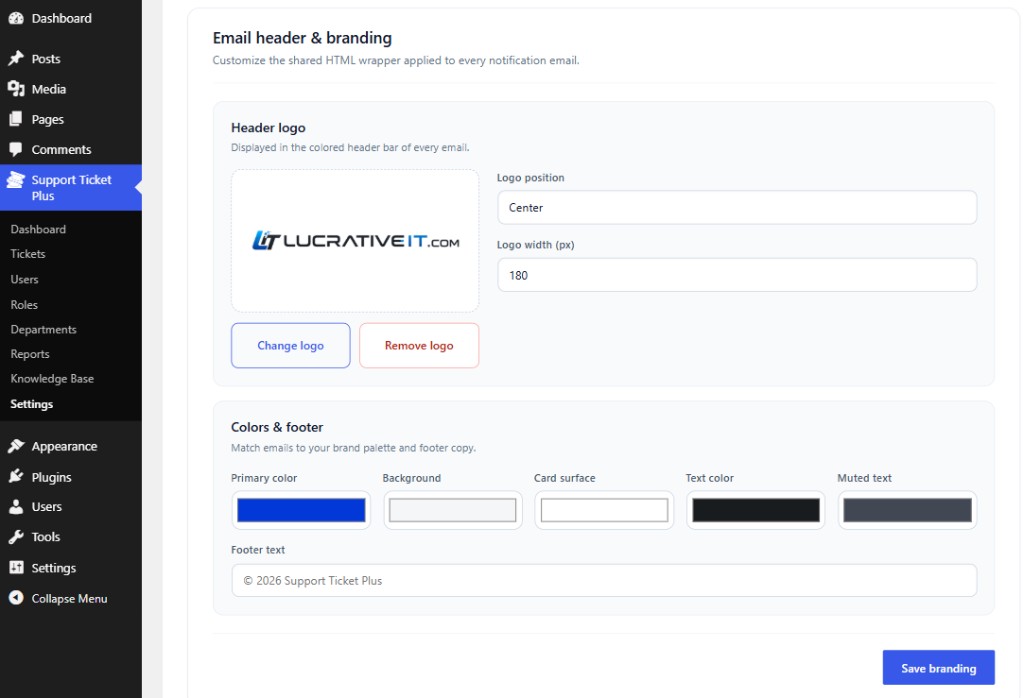
Email header and branding settings
Pro

Email header & branding

With Lucrative Support Ticket Pro, customize the shared HTML wrapper applied to every notification email — logo, colors, and footer copy.

  • Header logo: Upload your brand image, set position (left, center, right), and width (40–600 px).
  • Brand colors: Primary header bar, outer background, card surface, body text, and muted footer text.
  • Footer text: Custom copyright or support line shown at the bottom of every email.

Click Save branding once — changes apply to all notification types instantly.

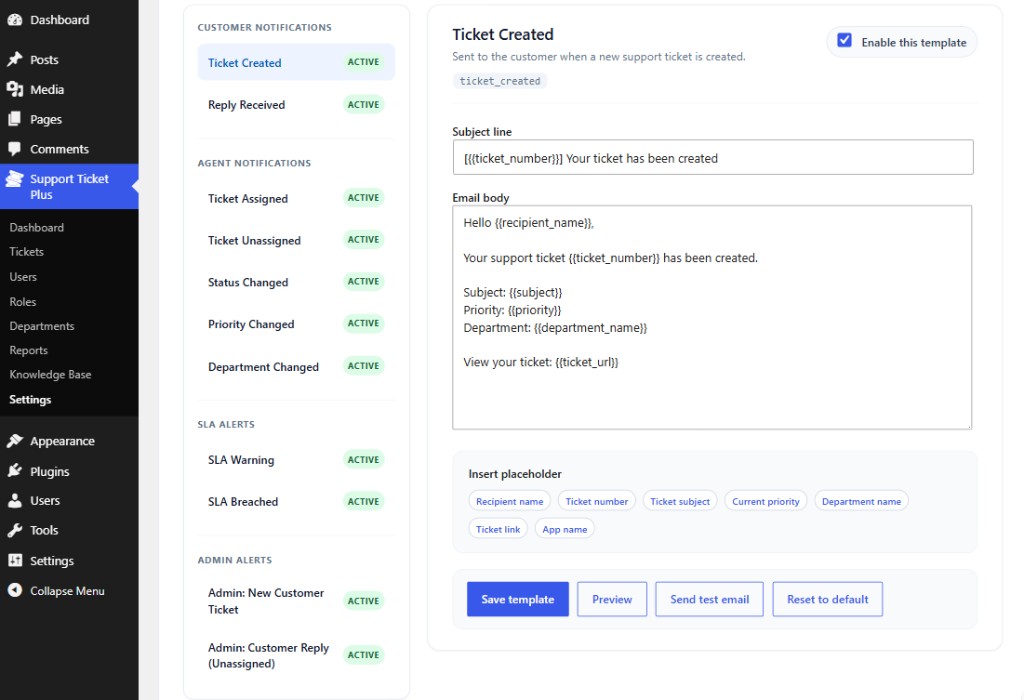
Email notification template editor
Pro

Notification templates & merge tags

Edit subject lines and body copy for every notification — customer, agent, SLA, and admin alerts — from a single sidebar-driven editor.

  • 11 templates grouped by audience, each with an enable/disable toggle.
  • Merge tags such as {{ticket_number}}, {{recipient_name}}, and {{ticket_url}} — click to insert.
  • Preview renders a live HTML sample with your current branding.
  • Send test email delivers a sample to your WordPress account inbox.
  • Reset to default restores the built-in copy for any template.

Configure SMTP first so preview and test emails deliver reliably.

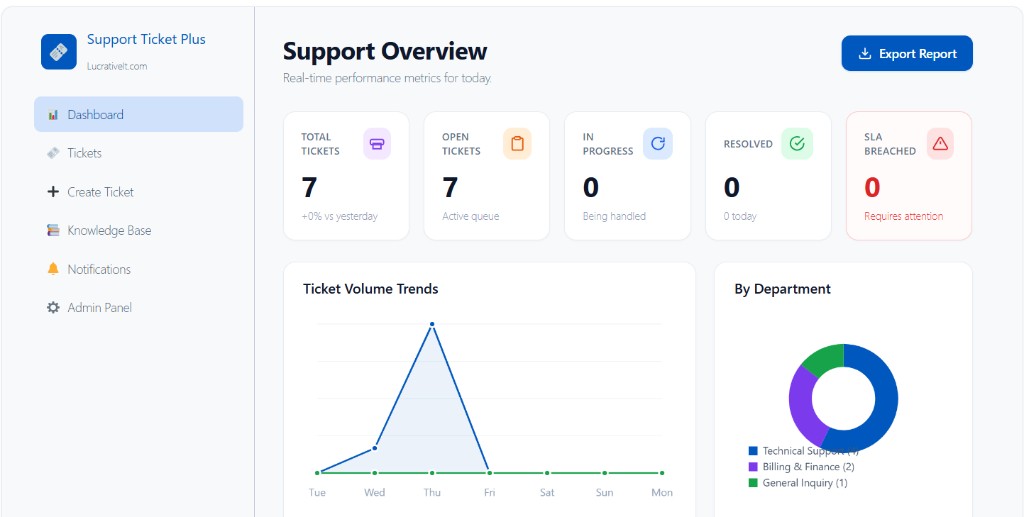
Admin support overview dashboard
Management

Admin dashboard

Monitor your support operation in real time from the WordPress admin overview.

  • Volume metrics: Total, open, in-progress, and resolved tickets.
  • SLA breaches: Tickets that missed their priority deadline.
  • Trends: Volume over time and department breakdown.
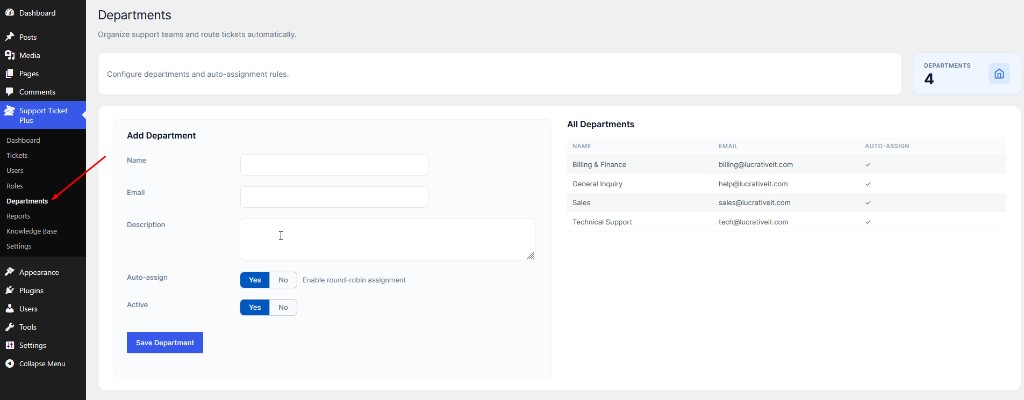
Departments management
Management

Departments

Organize support teams under Support Ticket Plus → Departments so tickets route to the right agents.

  • Name & email — identify the team and optional department mailbox.
  • Auto-assign — enable round-robin distribution among agents in that department.
  • Active — hide inactive departments from the create-ticket form.
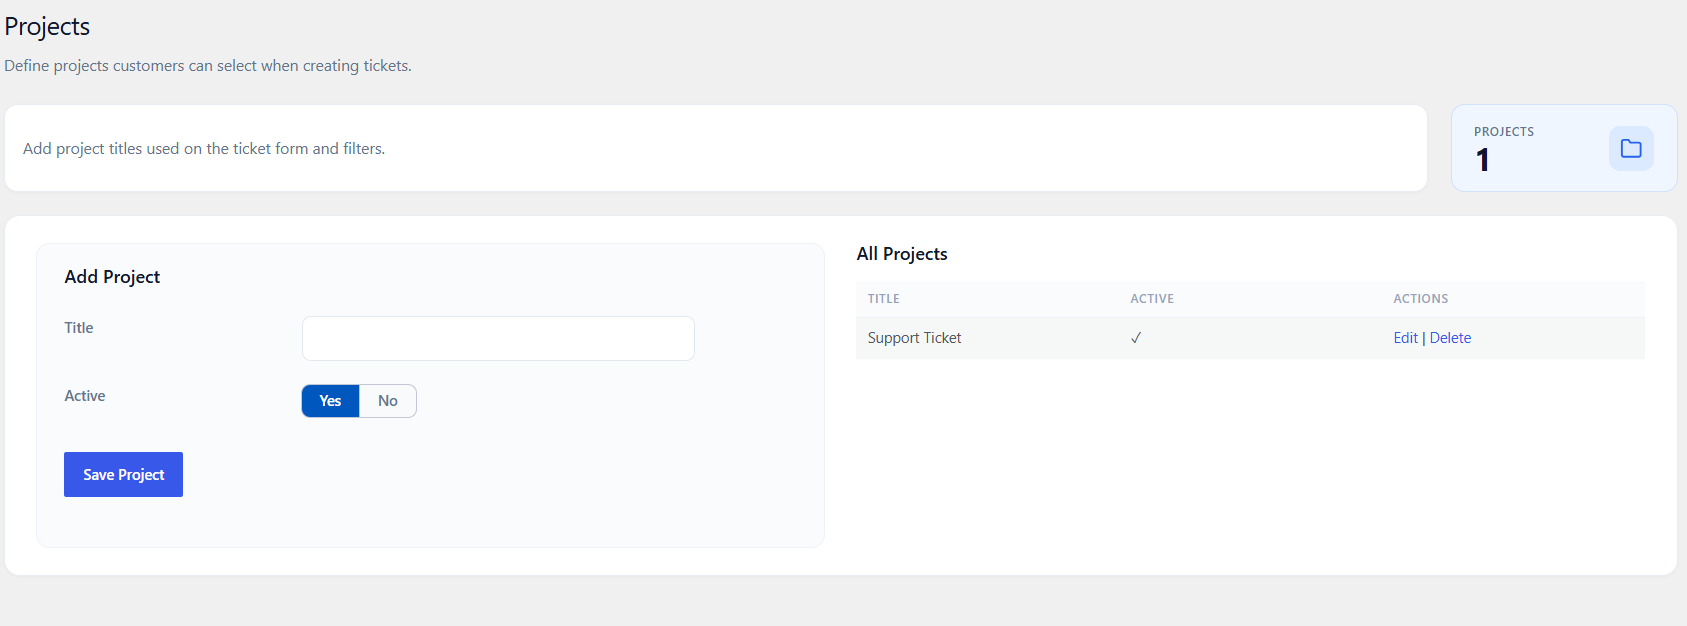
Projects management in admin
Management

Projects

Define project titles under Support Ticket Plus → Projects. Customers and staff select a project when creating a ticket; agents can filter ticket lists by project.

  • Title — short name shown on the create form and filters.
  • Active — only active projects appear on new tickets.
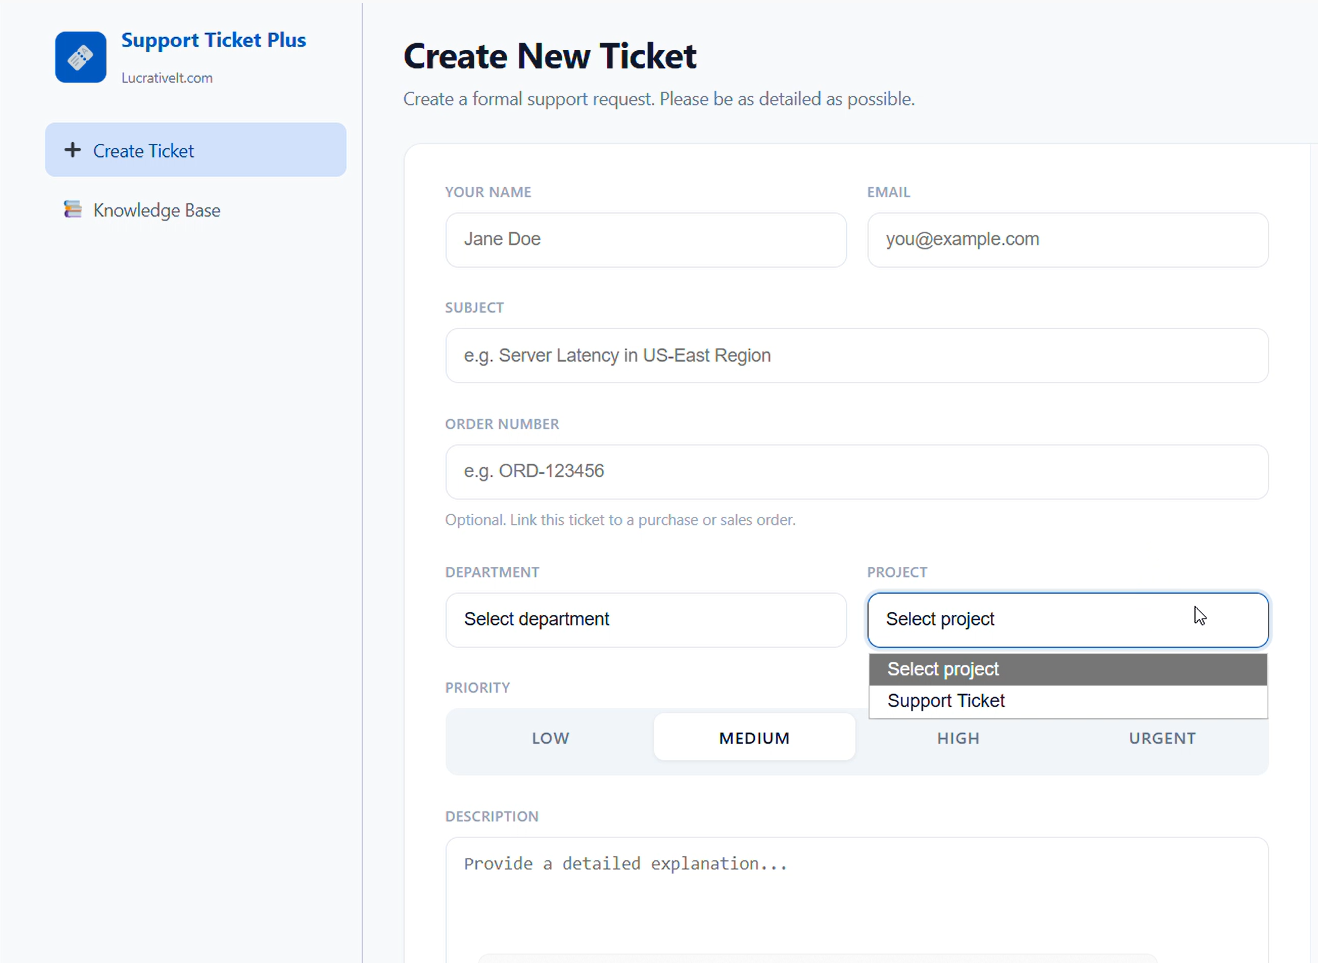
Project field on create ticket form
Ticketing

Select a project on create

The create-ticket form includes a Project dropdown next to Department so every request can be tagged to a product, site, or engagement.

Staff can later change the project from the ticket sidebar and filter queues by project in admin and portal lists.

Custom Fields settings
Settings

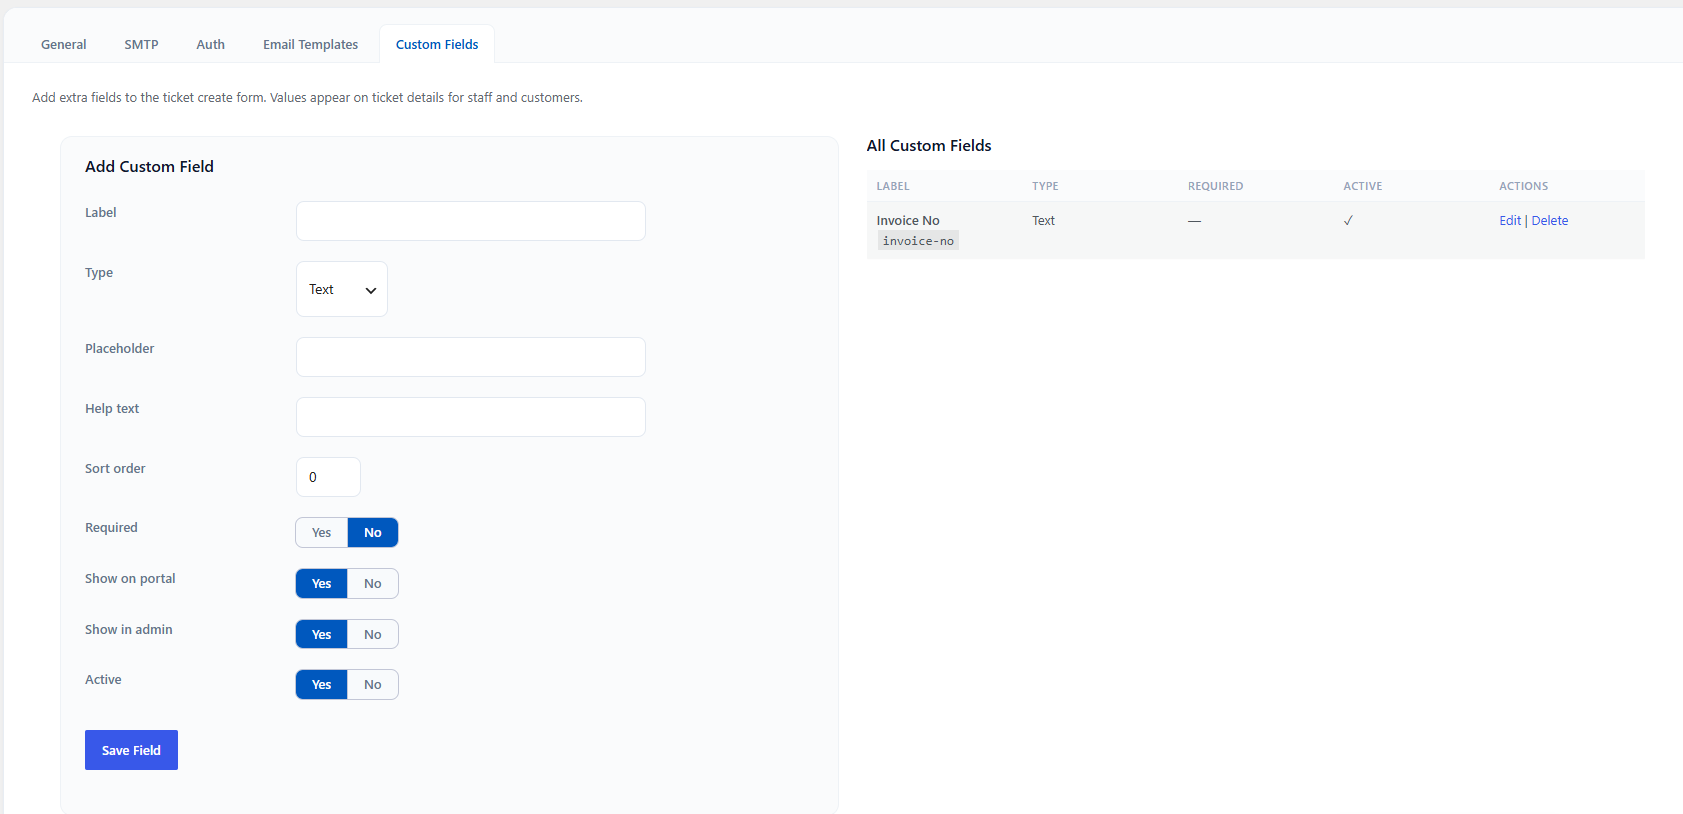
Custom Fields

Add extra fields to the ticket create form under Settings → Custom Fields. Values are saved with the ticket and shown on ticket details for staff and customers.

  • Types: Text, textarea, dropdown, checkbox, number, email, or URL.
  • Required — block submit until the field is filled (or checked).
  • Visibility — show on the public portal, in admin create, or both.
  • Sort order — control the order fields appear on the form.
Instant Reply settings
Settings

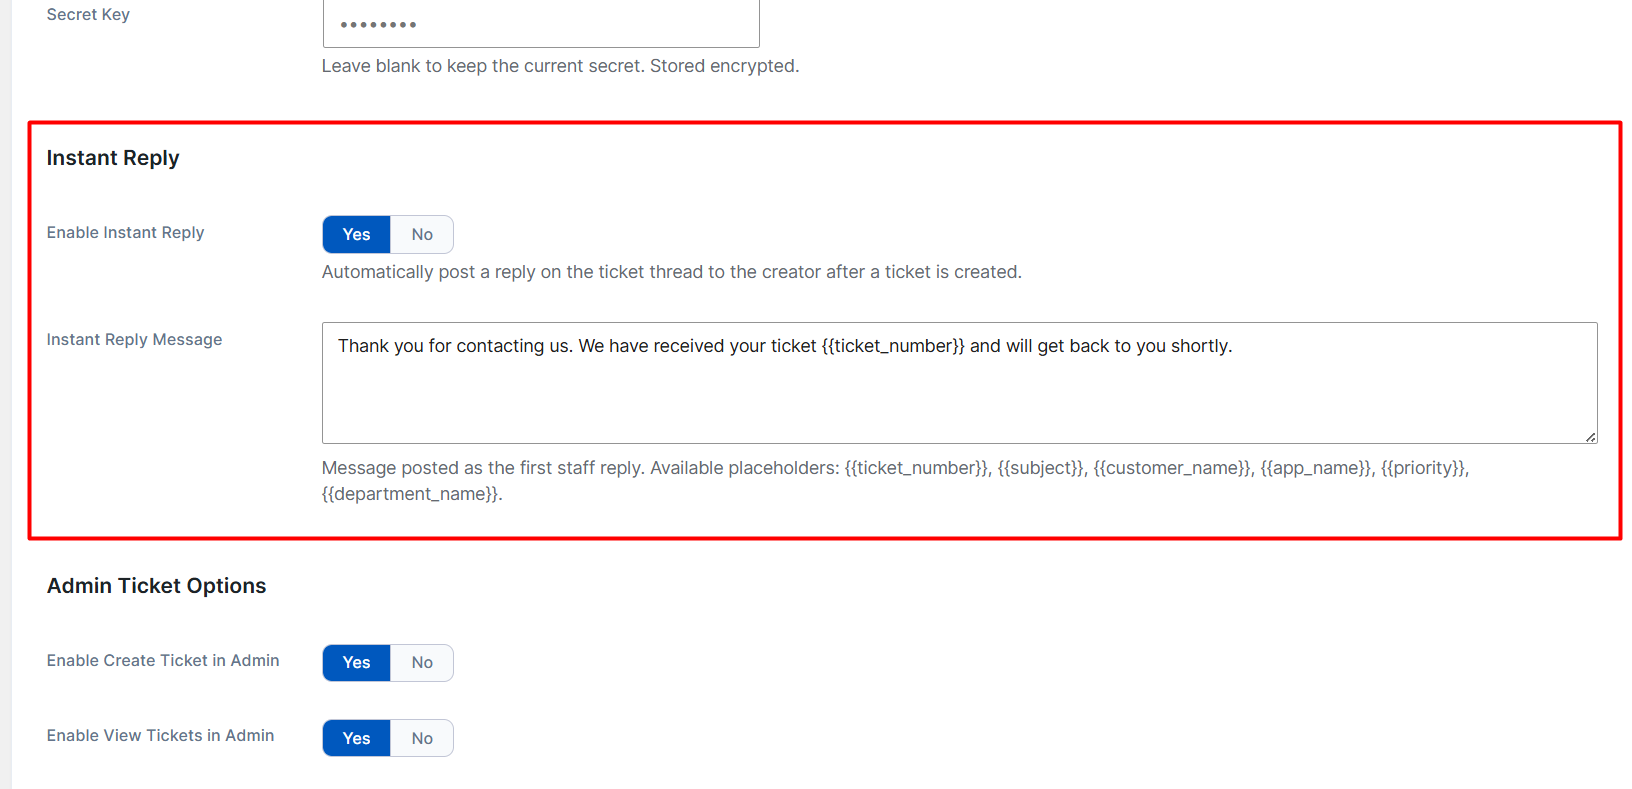
Instant Reply

Optionally post an automatic staff message to the ticket creator right after a ticket is created — useful for acknowledgements and next steps.

  • Enable under Settings → General → Instant Reply.
  • Message — supports merge tags such as {{ticket_number}} and {{customer_name}}.
  • Reply delay — wait a few minutes before posting for a more natural timeline.
Support Hours settings in admin
Settings

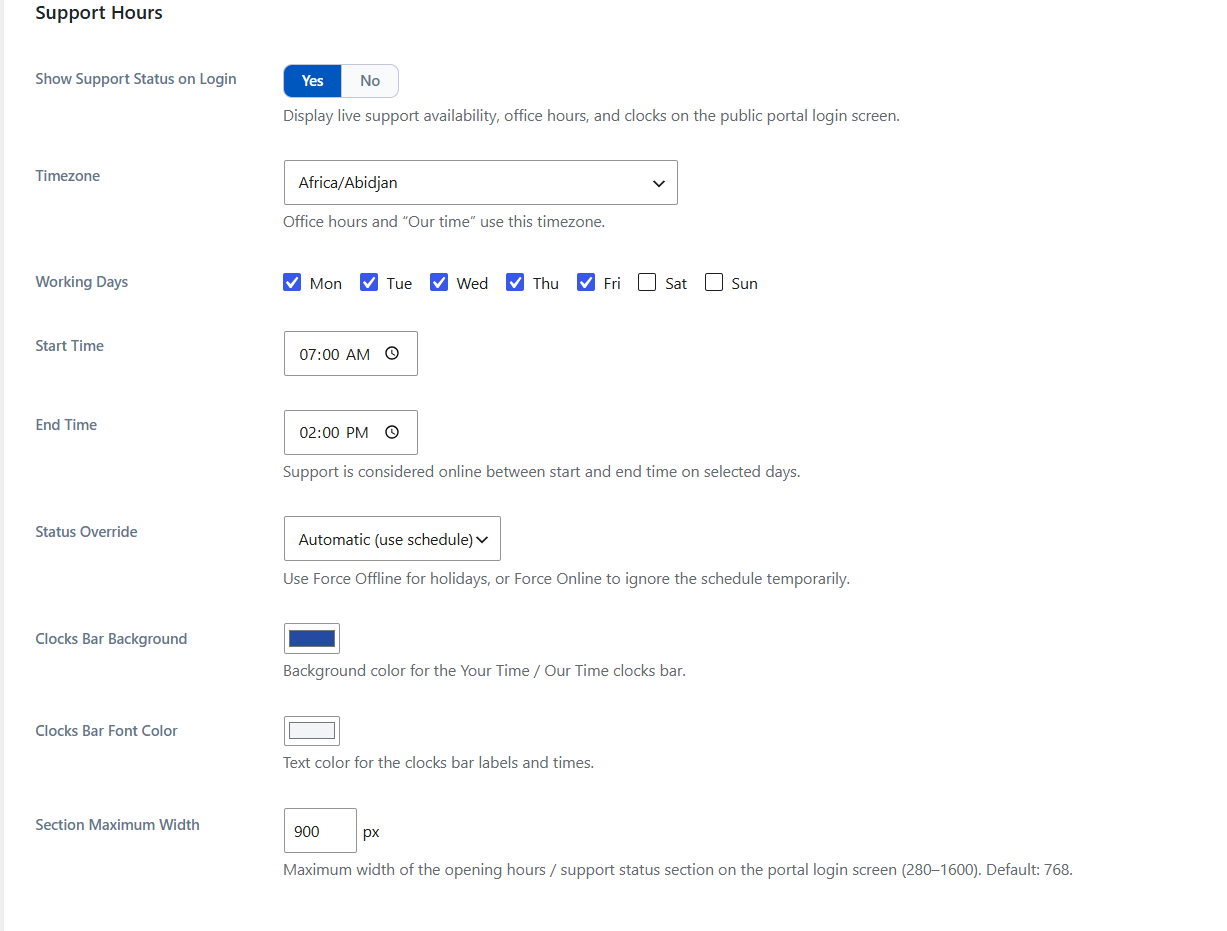
Support Hours (opening hours)

Configure when your team is available under Settings → General → Support Hours.

  • Timezone — used to evaluate working hours.
  • Working days and start / end times.
  • Status override — force online or offline when needed.
Support Hours on the portal login screen
Customer portal

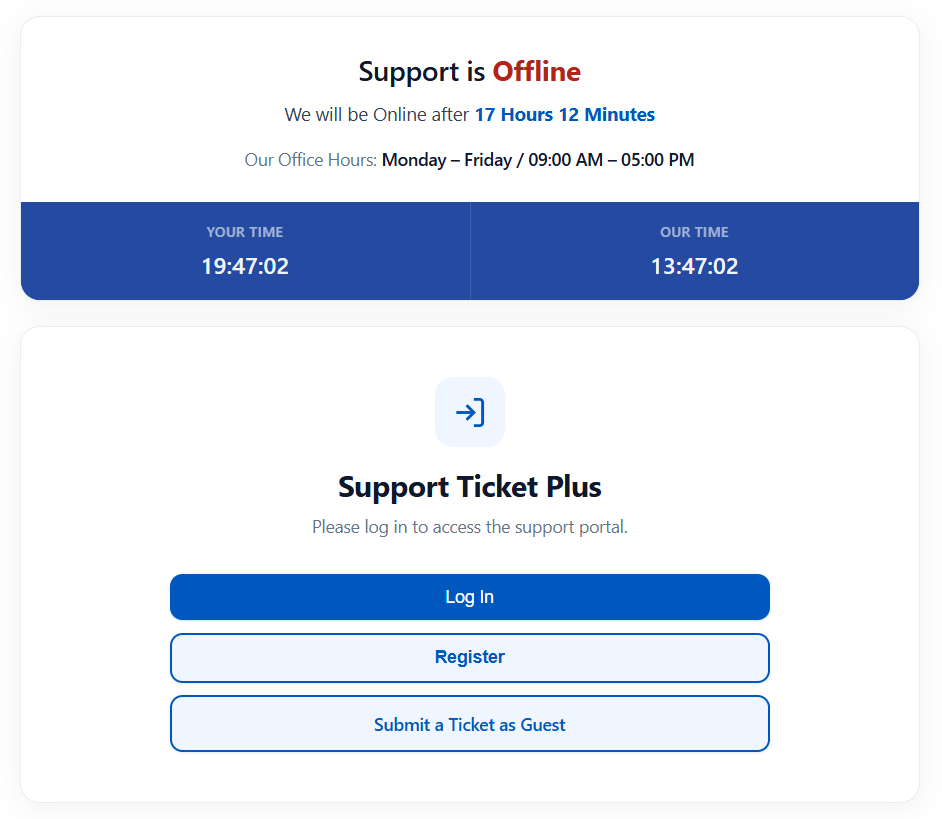
Support Hours on the portal

When enabled, the portal login screen can show live online/offline status and clocks so customers know when to expect a response.

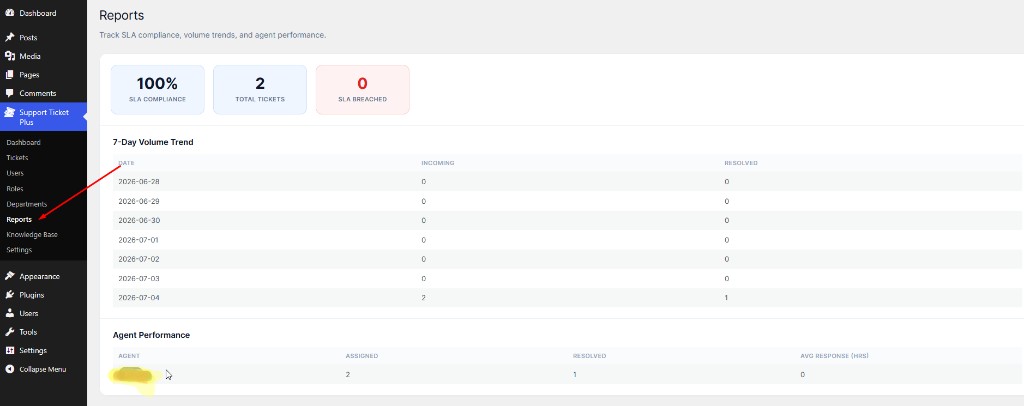
Reports dashboard
Management

Reports

Open Support Ticket Plus → Reports for SLA compliance, volume trends, and per-agent performance metrics.

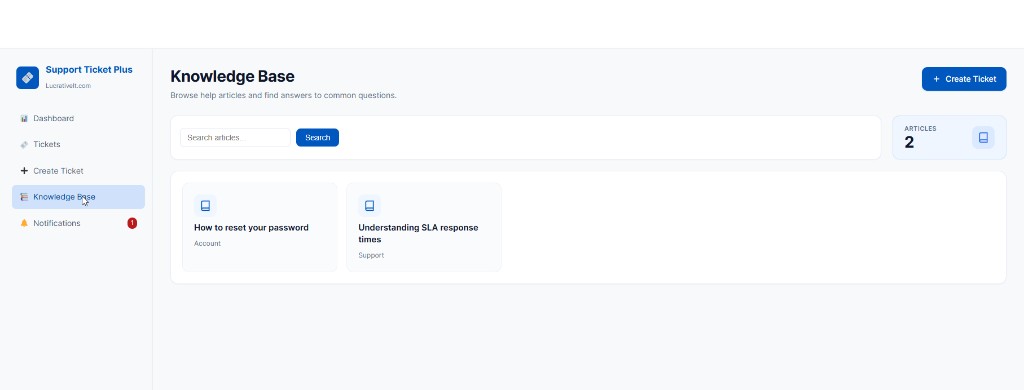
Customer knowledge base
Self-service

Knowledge Base

Publish self-service articles from admin and let customers search them from the portal Knowledge Base view — reducing repetitive tickets.

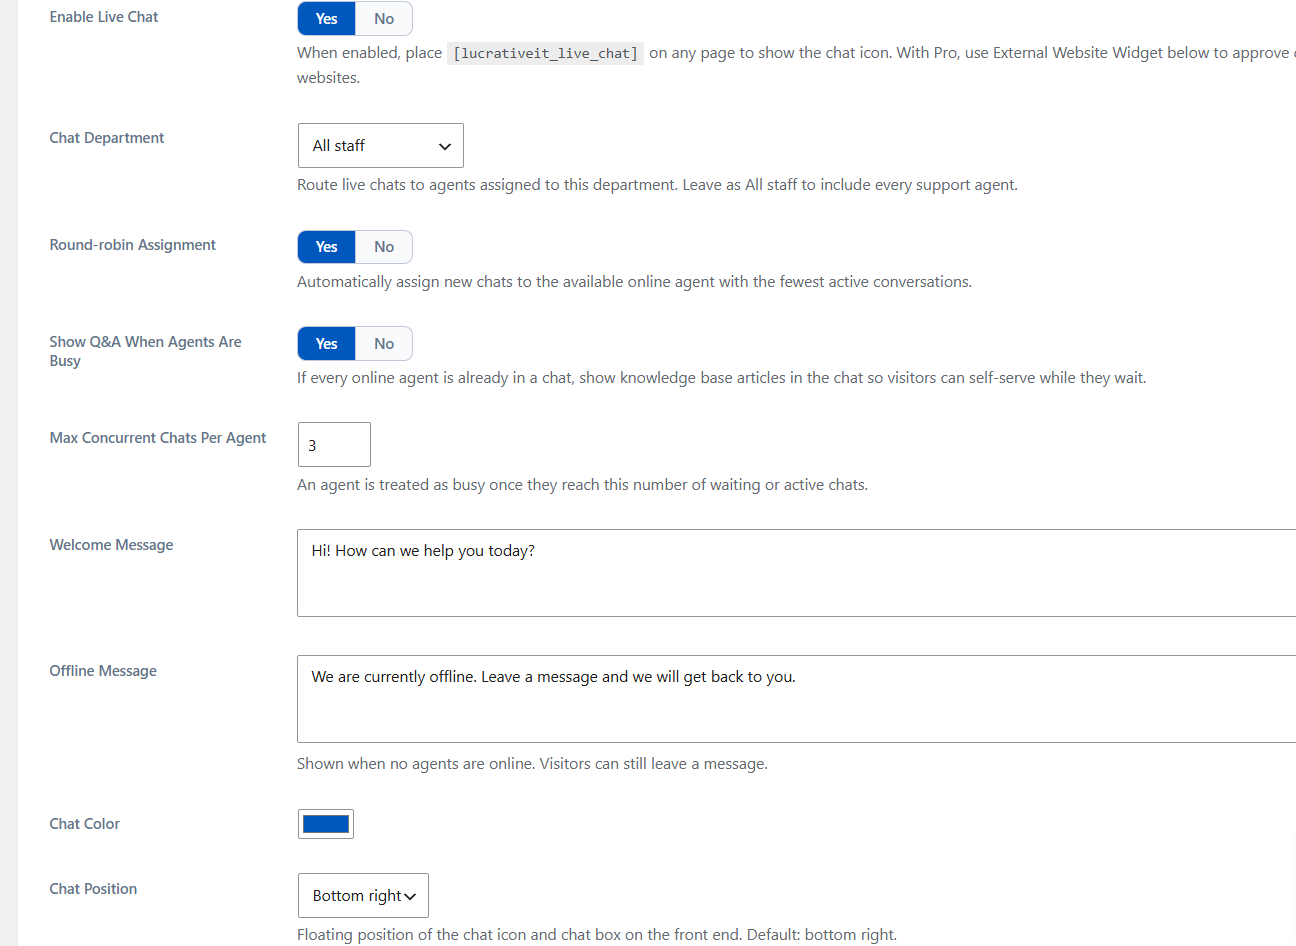
Live Chat settings
Live chat

Enable live chat on your site

Turn on a floating chat widget under Settings → Live Chat. Place the shortcode [lucrativeit_live_chat] on any front-end page.

  • Chat department — route conversations to one team, or leave as All staff.
  • Round-robin — assign new chats to the online agent with the fewest active conversations.
  • Busy Q&A — show knowledge base articles when every online agent is already in a chat.
  • Max concurrent chats — an agent is treated as busy once they reach this limit.
  • Welcome & offline messages — greet visitors, or invite them to leave a message when no one is online.
  • Color & position — brand the widget and place it bottom-right, bottom-left, top-right, or top-left.
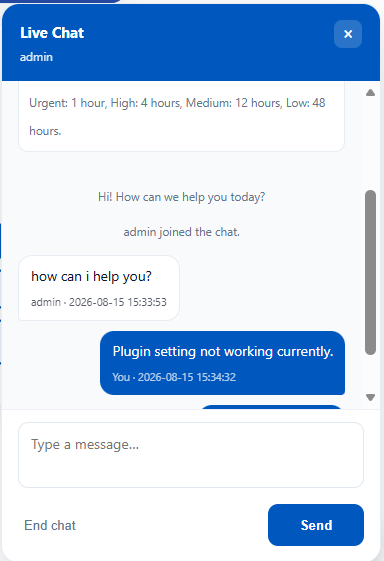
Live chat widget on the front end
Live chat

Floating chat box for visitors

Visitors open a compact chat panel from the floating icon. They can start a conversation, wait for an agent, or leave a message when you are offline.

  • Welcome message and SLA targets shown in the conversation.
  • Threaded messages with timestamps; visitors can end the chat themselves.
  • When agents are busy, optional knowledge base Q&A helps visitors self-serve.
Live Chat agent console
Live chat

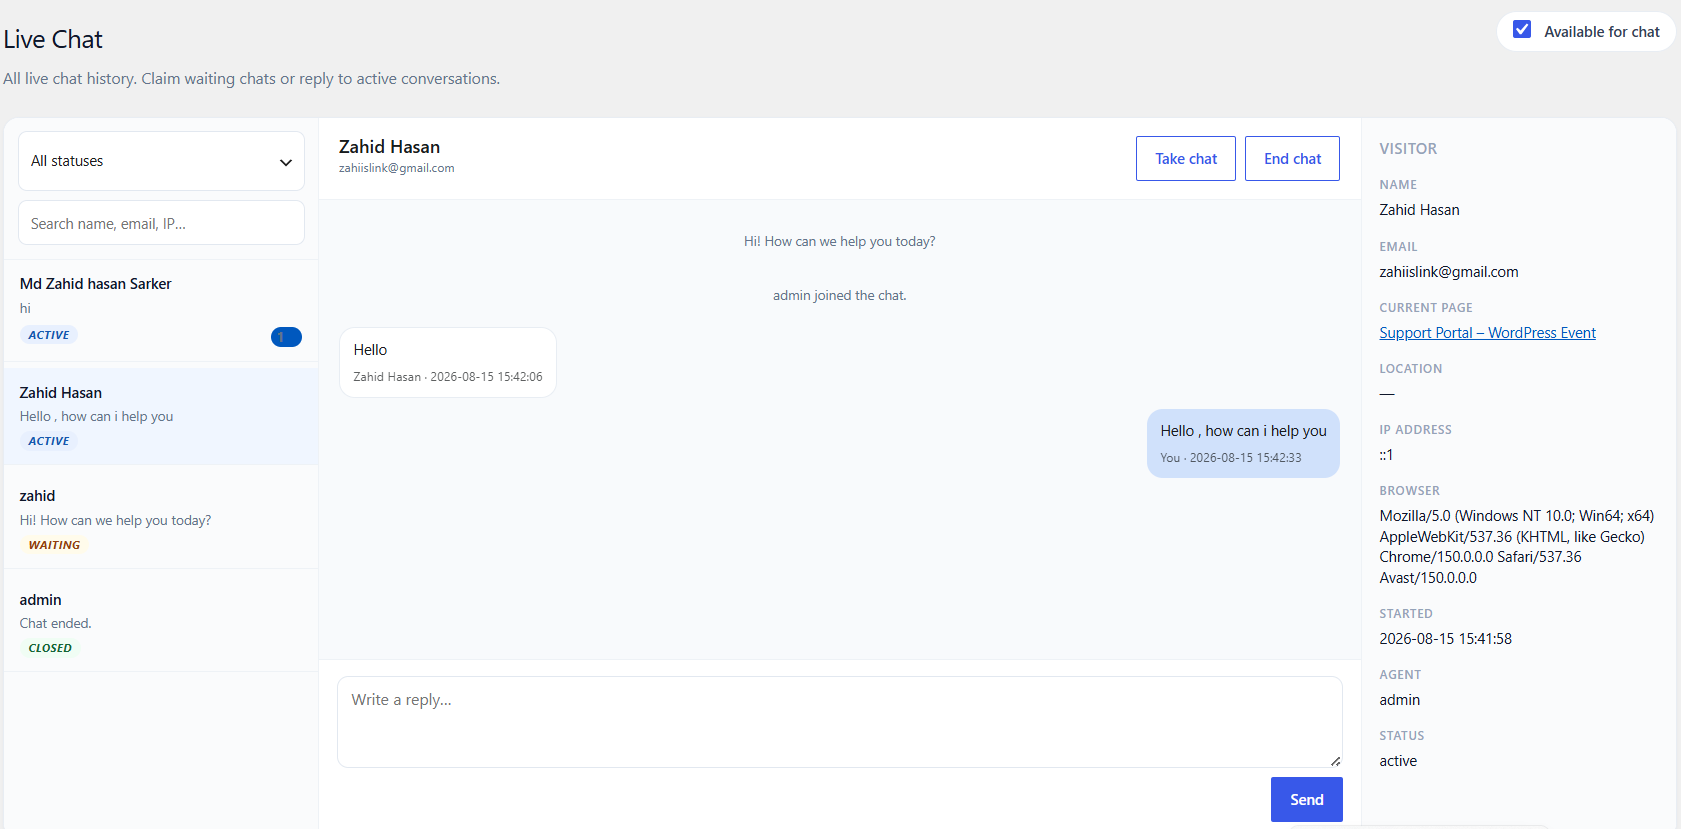
Agent console — Live Chat & My Chats

Agents claim waiting chats and reply from Live Chat (all history) or My Chats in the WordPress admin. Keep a Support Ticket Plus admin screen open so the agent is marked online.

  • Available for chat — toggle presence from the console header.
  • Waiting / active / closed — filter and search by name, email, or IP.
  • Take chat / End chat — claim a waiting visitor or close the conversation.
  • Visitor context — current page, location, IP, browser, start time, and assigned agent.
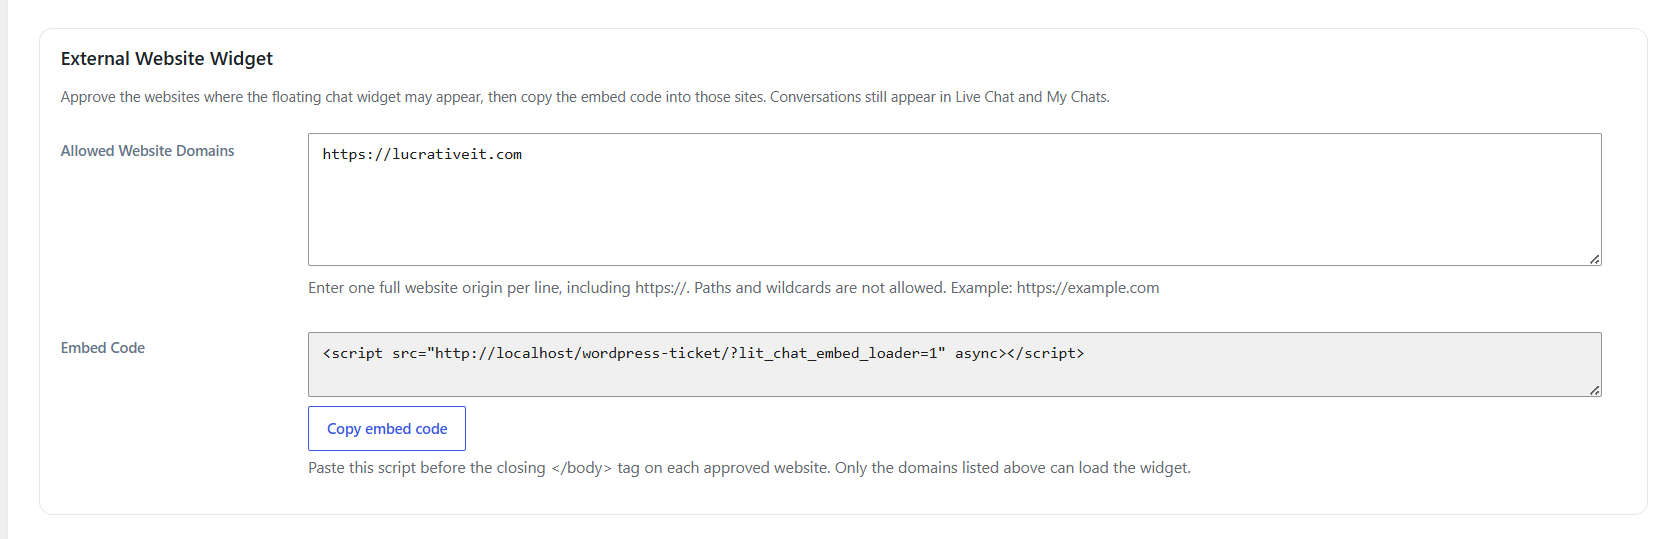
External website widget settings
Pro

Embed chat on other websites

With Lucrative Support Ticket Pro, approve domains and copy an embed script so the same live chat widget appears on other public or business sites.

  • Allowed Website Domains — one full origin per line (for example https://example.com). Paths and wildcards are not allowed.
  • Embed code — paste the script before the closing </body> tag on each approved site.
  • Conversations still appear in Live Chat and My Chats on your WordPress help desk.

Enable Live Chat first. Only listed domains can load the widget.

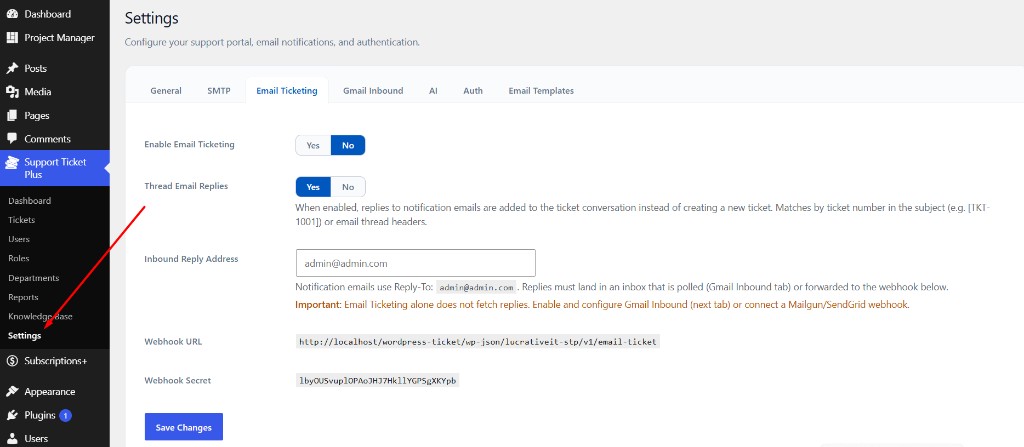
Email ticketing settings
Pro

Email ticketing & threaded replies

The optional Lucrative Support Ticket Pro add-on turns inbound email into tickets and threads customer email replies into existing conversations.

  • Enable email ticketing and thread replies by ticket number (e.g. [TKT-1001]).
  • Set an inbound reply address used as Reply-To on notification emails.
  • Connect Mailgun or SendGrid via the REST webhook URL and secret.

Note: Email ticketing alone does not fetch mail — configure Gmail Inbound or a provider webhook alongside it.

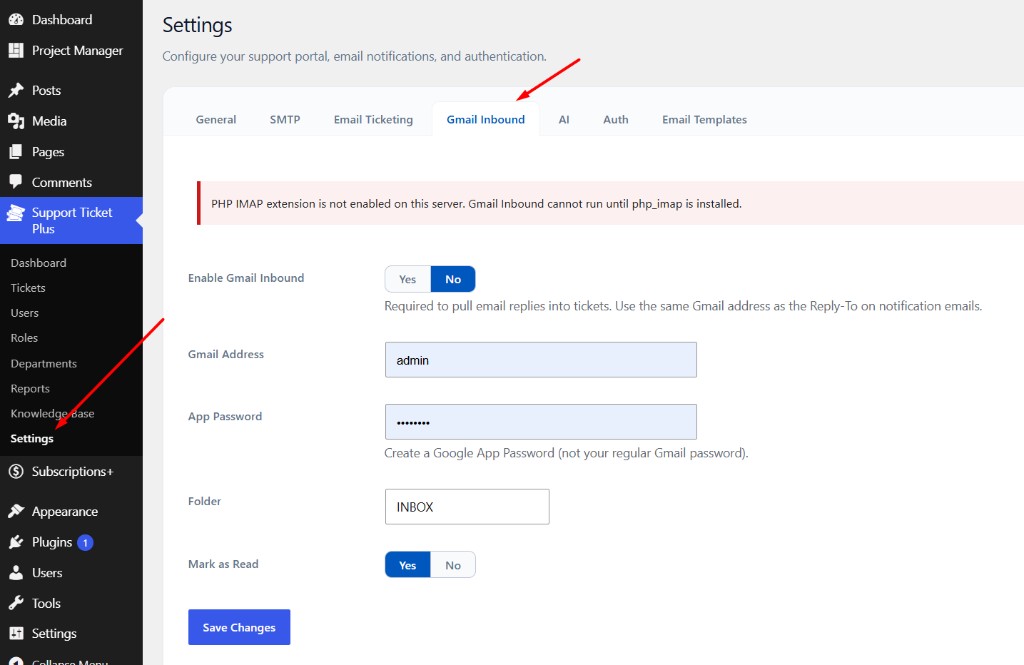
Gmail inbound settings
Pro

Gmail inbound polling

Pull email replies from a Gmail inbox directly into ticket conversations.

  • Requires the PHP IMAP extension (php_imap) on your server.
  • Connect with a Google App Password (not your regular Gmail password).
  • WP-Cron polls every minute by default; use a real server cron on production.
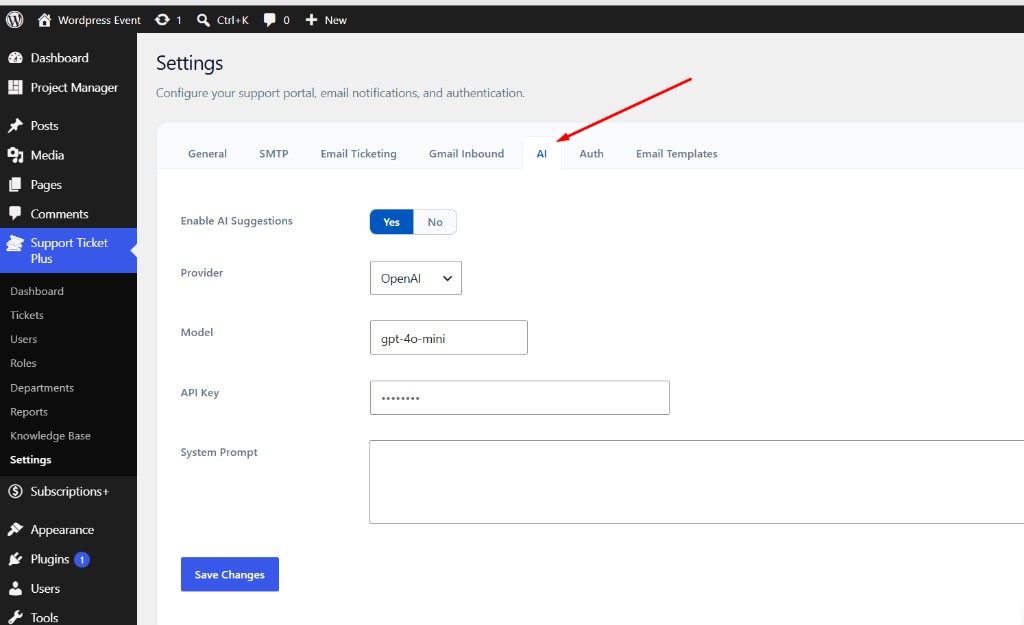
AI reply suggestions settings
Pro

AI reply suggestions

Help agents draft faster with AI-powered reply suggestions in the ticket composer.

  • Choose a provider (e.g. OpenAI) and model (e.g. gpt-4o-mini).
  • Enter your API key and optionally a custom system prompt.
  • Agents see AI tools directly in the reply composer while handling tickets.

Pro also includes optional Google login on the Auth settings tab.

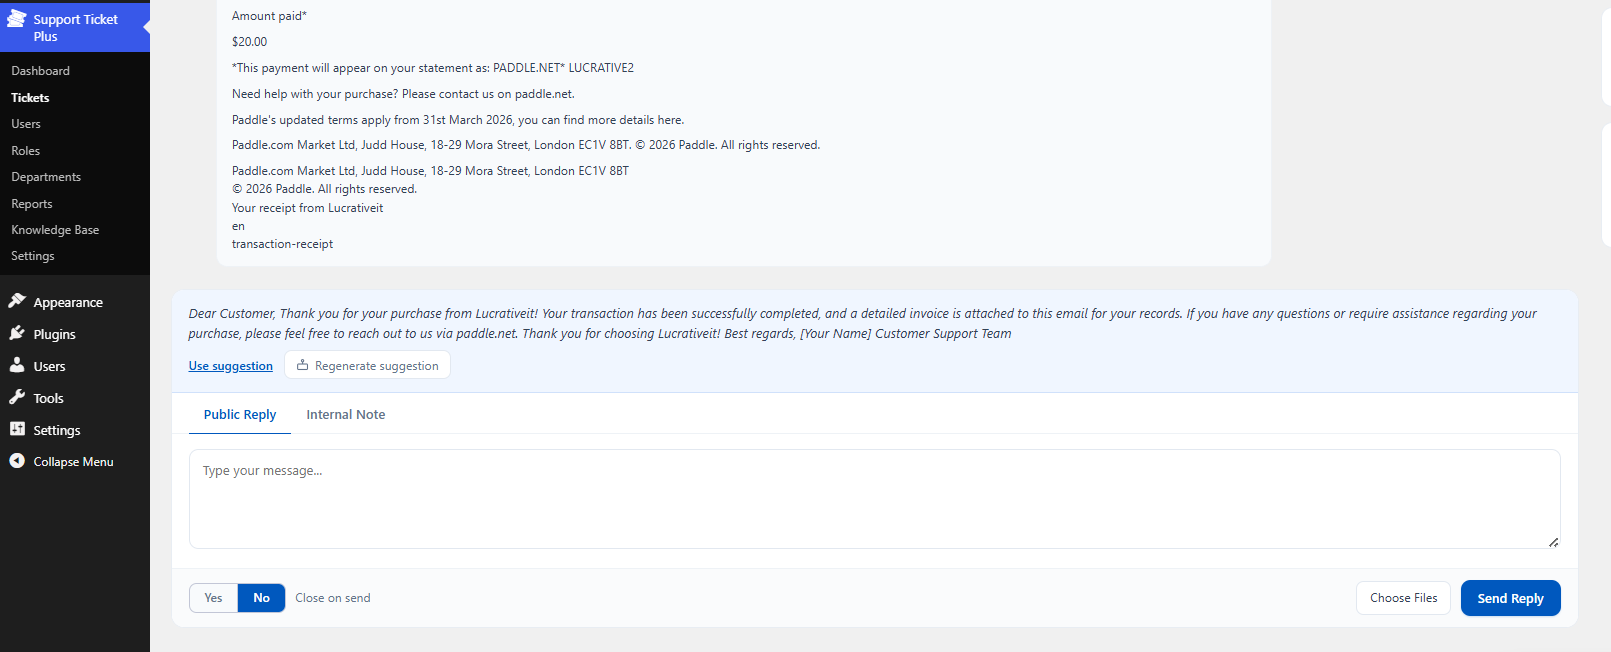
Generate AI reply in the ticket composer
Pro

Generate AI reply

With AI enabled, agents can generate a draft reply directly in the ticket composer, then edit and send as a public reply or internal note.

  • Uses the conversation context and your configured system prompt.
  • Suggestions appear as tools above the reply box — insert, refine, then send.

Frequently Asked Questions

Common questions about Support Ticket Plus installation, setup, and usage.

What are the server requirements?

Support Ticket Plus requires WordPress 6.2+ and PHP 8.2+. For the Pro Gmail Inbound feature, the PHP IMAP extension (php_imap) must also be enabled on your server.

How do I show the support portal on my site?

On activation, a Support Portal page is created with the shortcode [lucrativeit_support_portal]. Add that page to your navigation menu under Appearance → Menus. You can also create a custom page with the same shortcode.

How do I enable customer registration?

Enable registration in two places: (1) WordPress Settings → General → Anyone can register, and (2) plugin Settings → Auth → Allow Registration. Both must be on. New users get the Subscriber role and can only see their own tickets.

Can customers submit tickets without creating an account?

Yes. Enable Settings → General → Allow Guest Tickets (on by default). Visitors click Submit a Ticket as Guest on the login screen, enter name and email, and receive a confirmation email with a secure magic link to view and reply to their ticket.

How do guest magic links work?

After a guest submits a ticket, they are redirected to the ticket via a signed URL containing lit_token. The same link is emailed for future access. Links are valid for 30 days. Guests can copy the link from the green banner on the ticket page using the Copy Link button.

How do I protect guest tickets from spam?

Enable Cloudflare Turnstile under Settings → General. Create a widget at Cloudflare Turnstile, then enter the Site Key and Secret Key. Turnstile appears on the guest create-ticket form only.

Why do I need SMTP? Can I use a third-party SMTP plugin?

Support Ticket Plus includes built-in SMTP so registration emails, ticket alerts, and reply notifications are delivered reliably without a separate plugin. Configure it under Settings → SMTP with your mail provider credentials.

How do I make someone a support agent?

Go to Support Ticket Plus → Roles and grant the Tickets permission to the user's WordPress role (e.g. Editor). There is no separate support role — the plugin uses your existing WordPress roles. Administrators always have full access.

Will front-end registrants see other people's tickets?

No. Front-end registrants receive the Subscriber role, which is not granted the staff Tickets permission. They can create and view only their own tickets. To make someone staff, grant Tickets permission to their role on the Roles screen.

What is the difference between Plus and Pro?

Support Ticket Plus (free) includes the full help desk: portal, live chat, SLA tracking, departments, projects, custom fields, support hours, instant reply, round-robin assignment, SMTP, reports, knowledge base, roles, file uploading, ticket timeline, and email templates. Lucrative Support Ticket Pro (add-on) adds email-to-ticket webhook, Gmail inbound polling, AI reply suggestions, Google login, and an external live chat widget for other websites.

How does email-to-ticket work with Pro?

Enable Email Ticketing under Pro settings, set an inbound reply address, and connect either Gmail Inbound (IMAP polling) or a Mailgun/SendGrid webhook using the provided REST URL and secret. Replies to notification emails are threaded into the existing ticket by ticket number or email headers.

What file types can customers attach to tickets?

Supported formats are PDF, PNG, JPG, DOC, and ZIP. Customers and staff can upload files when creating a ticket or when replying. The maximum file size is configurable under Settings → General → Max Attachment Size (default 10 MB).

How do I add custom fields to the ticket form?

Go to Settings → Custom Fields, add a field (label, type, required, and whether it shows on the portal and/or admin create form). Values appear on ticket details after submit.

How do Projects work?

Create project titles under Support Ticket Plus → Projects. Customers select a project when creating a ticket. Staff can change the project on the ticket and filter lists by project.

What is Instant Reply?

Under Settings → General, enable Instant Reply to automatically post a configurable message to the ticket creator after a ticket is created. Optionally set a delay in minutes and use merge tags such as {{ticket_number}}.

How do I enable live chat?

Go to Settings → Live Chat and set Enable Live Chat to Yes. Choose a department, optionally enable round-robin, and optionally show knowledge base Q&A when all agents are busy. Place [lucrativeit_live_chat] on any front-end page. Agents use Live Chat (all history) and My Chats in the admin menu. Keep a Support Ticket Plus admin screen open so the agent is marked online.

How do I embed the chat widget on another website?

Install Lucrative Support Ticket Pro, enable Live Chat, then open Settings → Live Chat → External Website Widget. Add each website origin (for example https://example.com), save settings, copy the embed code, and paste it before the closing </body> tag on those sites. Only approved domains can load the widget.

Does Gmail inbound require a cron job?

With the Pro add-on, WP-Cron polls Gmail approximately every minute by default. For production sites, set up a real server cron that hits wp-cron.php on a schedule for reliable polling.

General settings configuration
Allow registration setting
Submit a ticket as guest on the login screen
Cloudflare Turnstile settings
Turnstile widget on guest ticket form
SMTP configuration
Create new ticket form
Staff ticket list
Portal notifications
Email header and branding settings
Email notification template editor
Admin support overview dashboard
Email ticketing settings
Gmail inbound settings
AI reply suggestions settings
Customer dashboard overview
Customer My Tickets list
Create ticket from staff or admin portal
Departments management
Projects management in admin
Project field on create ticket form
Custom Fields settings
Instant Reply settings
Support Hours settings in admin
Support Hours on the portal login screen
Reports dashboard
Customer knowledge base
Generate AI reply in the ticket composer
Live Chat settings
Live chat widget on the front end
Live Chat agent console
External website widget settings

More products

Explore the collection

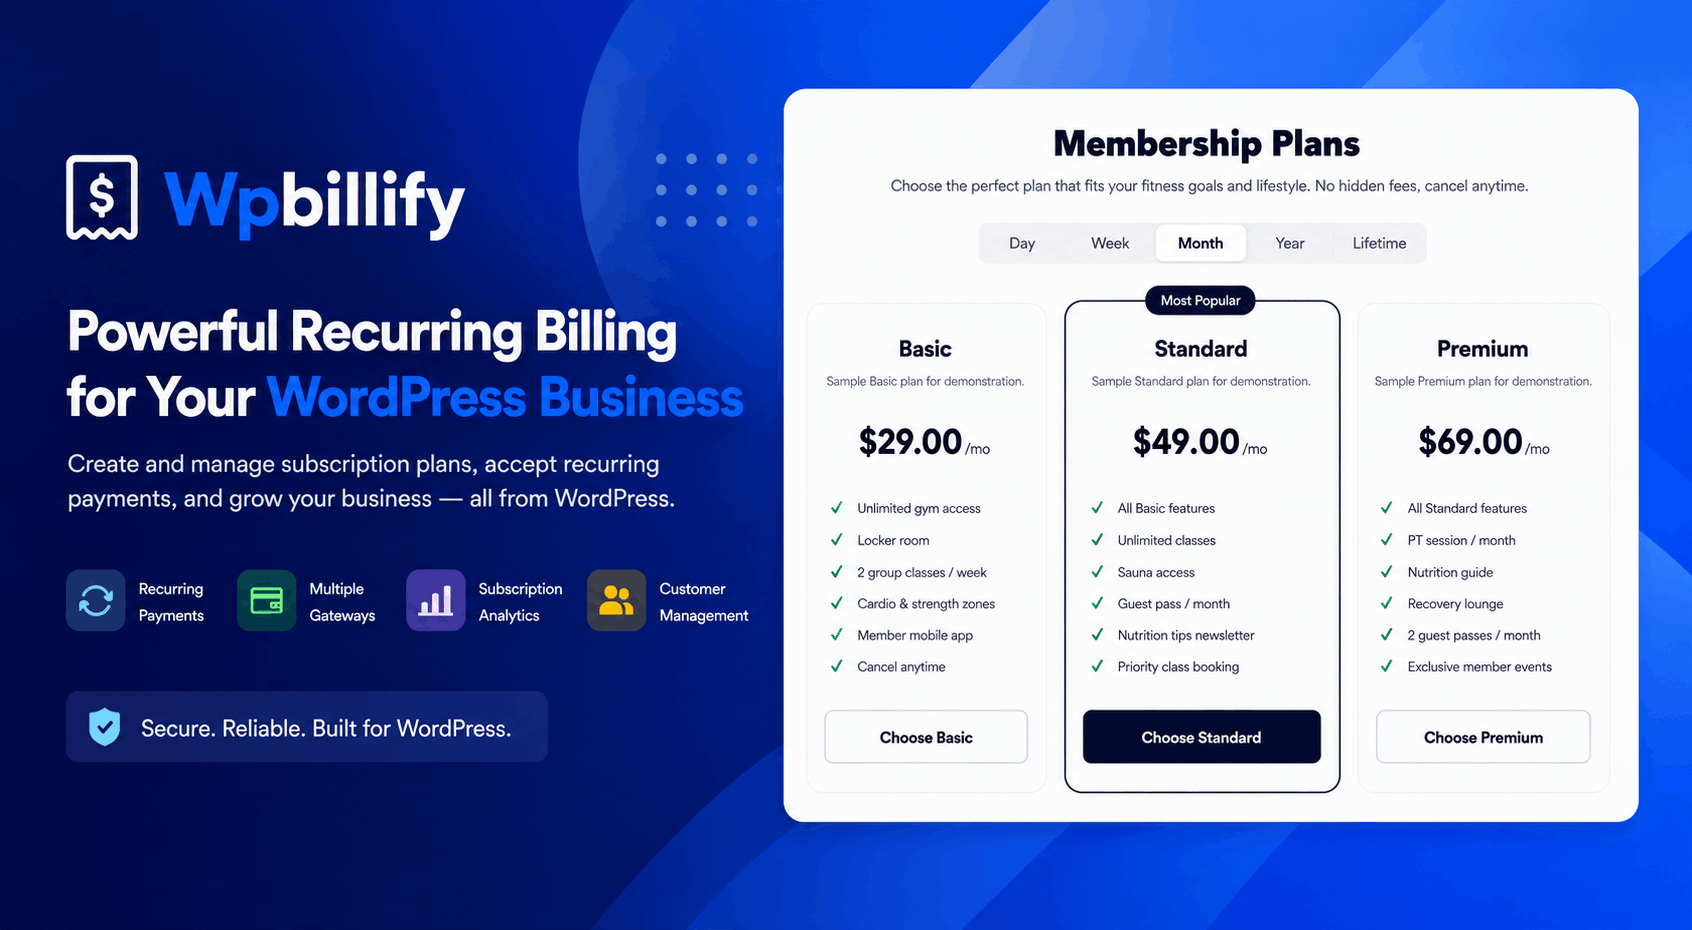
Subscription and Recurring Billing System for Wordpress

Wordpress Subscription and Recurring Billing

Subscription and Recurring Billing System for Wordpress

Lucrativeit Subscription & Recurring Billing(WPBillify) is a powerful WordPress subscription and recurring billing plugin that helps you create, sell, and manage subscription plans directly from your WordPress website.

$29.00 /year
View product

Ready to get started?

WordPress Support Ticket System – Help Desk Plugin

Choose your plan above and purchase instantly, or scroll back up to review pricing and included benefits.

Purchase Now